The Activity Feed module is intended to line up the communication process among users within the same company, for example, among employees who set tasks and those who handle them.
This functionality allows you to monitor either on Additional Comments or Work Notes left within a record or to track the record field changes (all record fields or a field set specified by the user).
Activity Feed can be used in table records in both of the main interfaces (agent interface and Self-Service Portal), which enables the use of the module without specific roles.
Create an activity feed
To use a feed on forms, you need to configure the Activity Feed widget first. To do this, complete the steps below:
- Navigate to Portal Structure → Widgets.
- Click New to create a new widget.
- Fill in the fields as described below.
- Click Save or Save and Exit to apply the changes.
Widget form fields
| Field | Mandatory | Description |
|---|---|---|
| Name | Y | Specify a name for the widget. For example: "Activity feed widget". |
| Description | Y | Enter a brief description of the widget. For example: "Enabling activity feed on tasks". |
| Active | Select this checkbox to activate the widget. Until the widget is not activated, it cannot be used within objects. | |
| Template | N | Fill in the widget template. The default template value will contain the <activityFeed> SimpleTag: activityFeed <activityFeed></activityFeed> Check the widget creation procedure for more information about this field. |
| CSS | N | Specify CSS classes for the widget structure and style. |
| Client Script | N | Fill in the widget client logic if necessary. Check the widget creation procedure for more information. Generally, no additional logic is required in the described case. |
| Server Script | N | Fill in the widget server logic if necessary. Check the widget creation procedure for more information. Generally, no additional logic is required in the described case. |
| Demo Data | N | Specify additional widget options if necessary. Check the widget creation procedure for more information. |
| Tables | N | Specify tables (one or more) to enable the activity feed functionality on their forms. |
| Inheritance | N | Select this checkbox if you want to make the widget available for adding to child table forms. |
After the record is saved, the activity feed can be added to the record form using Form Layout functionality as described below.
Add an activity feed to forms
Add the activity feed widget created in the previous step to the record form using the Form Layout functionality. To do this, complete the steps below:
- Open the hamburger menu in the top left of the form.
- Navigate to the Configure → Form → Layout item and click it.
- Find the Activity Feed widget in the Available area and move it to the Selected area.
- Click Save to apply the changes.
After this, your changes are displayed on the record form.
Perform these steps for every form on which you need to enable the Activity Feed functionality since it is not inherited, and every activity feed is related to the specified table.
By default, two activity feed fields are available:
- Additional Comment
- Work Note
When the Activity Feed is added to the form with fields of the Journal Input type, these fields are hidden on the form. The Activity Feed displays input fields and activity types corresponding to the hidden ones. Input fields have the same logic as hidden fields. For example, they become mandatory or hidden from the widget under certain conditions.
See the Creating custom activity feed field section of this article to customize your activity feed.
Activity feed default view
After a widget is created and added to a form layout as described above, create a new record or open an existing one to find the activity feed view as shown below (this screenshot is given as an example; the out-of-the-box version in your application may differ).
The Additional Comments and Work Notes fields are both of the Journal Input type and intended for user communication.
- The Additional Comments field is for communication with the caller. It may contain progress updates or clarifying questions. These comments are visible to the requestor on the portal view of the record.
- The Work Notes field is for internal communications among the task fulfillers (agents). These comments may be technical and can contain information that should not be shared with the caller.
Comments or work notes can be sent using the Ctrl + Enter keyboard shortcut.
Besides that, the Activity Feed displays the history of field changes. It displays information on the fields whose values have been changed.
- Previous values are in gray color. The new values are in black color.
- Field changes are displayed according to the history display settings.
By selecting the tabs under the input field, you can filter out the displayed information.
| Section | Description |
|---|---|
| All | This section displays all field changes and all comments left in this record. |
| Work Notes | This section allows users to filter out only work notes left in this record. |
| Additional Comments | This section allows users to filter out only additional comments left in this record. |
| History | This section allows users to filter out only record field changes. |

Filtration
The displayed information can be filtered for specific users or user roles by using the ACL functionality. Thereby, the activity feed view can look different for users granted different roles. To filter displayed information, Create an ACL Rule for information filtering.
For securing fields that allow you to leave comments on records (such as Additional Comments or Work Notes), create an ACL rule for a corresponding column of the Journal Input type.
Otherwise, you may create an ACL rule that will restrict access to the Activity Types (sys_activity_type) table for specified roles.
In the Activity Column Filters (sys_activity_column_filter) table, activity type settings are saved for each user individually.
To display changes of the specified fields in the History section instead of all fields changes, use the Select fields handler functionality:
- Click the three dots on the right to open the kebab menu.
- Click the Select fields.
- Clear fields whose changes should not be displayed in the activity feed.
- Click Apply.
If History contains fields that have been changed but are not selected in the Select fields handler, they will be replaced by the No fields selected text:
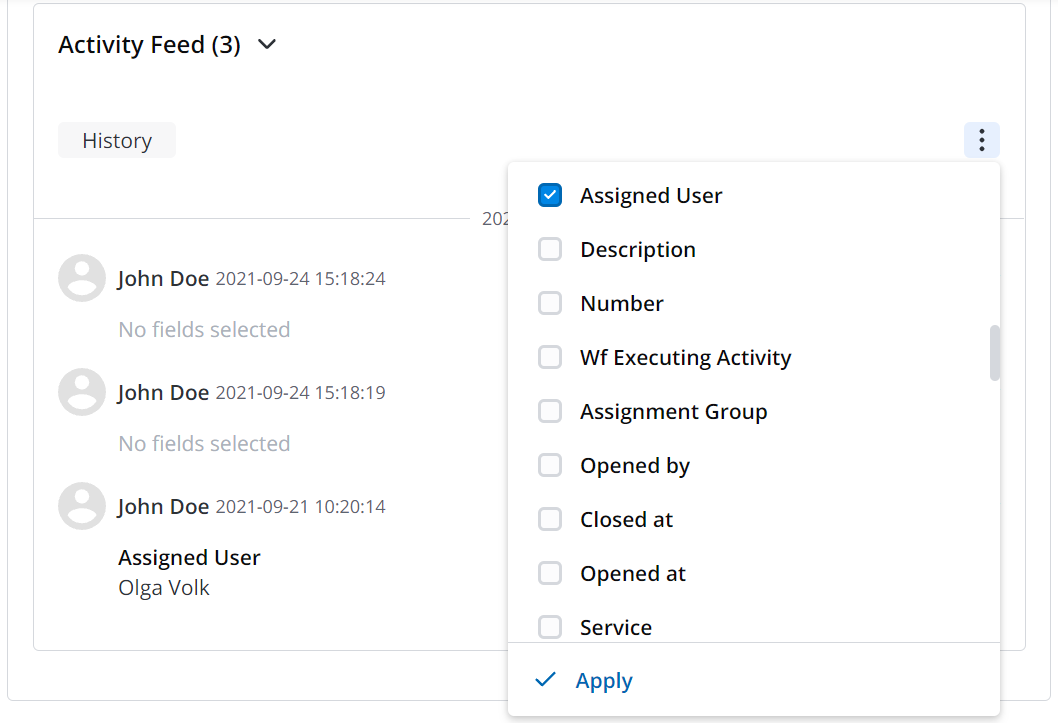
Even if the field value changes are not displayed here, they are logged and can be reached in the History dictionary.
Add an activity feed to pages
You can add the Activity Feed widget to pages. To learn how to do this, see the Portal Structure article.
For the portal pages, download the SOP. file with the preconfigured Activity Feed widget that has its own style. Then import the local pack so that the Activity Feed for Portal widget appeared in the Widget (sys_widget) table. See the Importing configuration packs article to learn more. Add the widget to the portal page you need as described in the Portal Structure article.
Create a custom feed type
By default, two commonly used fields of the Journal Input type are delivered for Task objects; these are the Additional Comment and Work Notes fields.
To add custom journal input fields, complete the steps below:
- Navigate to System Settings → All Columns.
- Click New and fill in the fields.
- Click Save or Save and Exit to apply the changes.
Another way to add a column is through the related lists in the Table (sys_db_table) record. Open the table you want to add a new activity type to, scroll down to the Related Lists area, open the Columns tab, and click New.
Journal Input fields
| Field | Mandatory | Description |
|---|---|---|
| Table | Y | Specify a table on which the activity feed widget is enabled (for example, the Task table). |
| Column Type | Y | In this field, select the Journal Input value. |
| Title | Y | Specify a column title for the additional field in any language. It will be displayed on the record form. |
| Name | Y | This field contains a system column name and is populated automatically once you have filled the column title. |
See the Column Attributes article to learn about a more precise configuration.
As a result, a new activity type will be created automatically by the system in the Activity Type (sys_activity_type) table.
Configure a feed set
You can easily configure the set of activity feed fields using the Form layout functionality.
To add or remove an activity feed field, perform the following steps:
- Open the record form that you need to configure.
- In the hamburger menu
 , navigate to Configure → Form → Layout.
 - In the Section field, select the section containing the Activity Feed.
- Move the field of the Journal Input type:
- from the Available section to Selected to add the field to the Activity Feed.
- from the Selected section to Available to remove the field from the Activity Feed.
- Click Save.
When creating a new record, you will see the Journal Input fields as regular fields. In saved records, these fields are included into the Activity Feed.
Customization
To configure a new activity feed field, complete the steps below:
- Navigate to Activity Feed → Activity Types.
- Open the activity you need and fill in the fields.
- Click Save or Save and Exit to apply the changes.
Activity Type form fields
| Field | Type | Description |
|---|---|---|
| Title | N | Custom activity feed field title displayed on the record form. This field is of the Translated Text type, so you can define a title in any language. To add a title for a language other than the default one, complete the steps below:
|
| Name | N | This field contains an activity system name and is populated automatically out of the table name and the journal input column name. |
| User Created | N | This checkbox is intended to distinguish custom activity types from the out-of-the-box ones to be able to filter them out if needed. |
| Specific tab | ||
| Title (plural) | N | Specify a title plural form if needed. |
| Parent | N | A parent activity type. If this activity type is of the highest level, then this field value will be empty. |
| Table | N | A table or tables for which this field is enabled (for example, Task). |
| Journal Input column | N | A reference to the previously created column of the Journal Input type. |
| Style tab | ||
| Title color | N | Specify a title color that is displayed on the comment form. |
| Title background color | N | Specify a title background color that is displayed on the comment form. For example, settings like shown on the screenshot below
will cause a result as follows
|
| Icon | N | Here, you can add an icon to customize the activity type. The system will display it instead of the default speech bubble icon |

