The Self-Service Portal (SSP) provides end-users a simple interface to their IT support organization.
By default, it provides access to actions such as viewing user profile and cabinet, browsing the Service Catalog, reading Knowledge Base articles, and working with incidents (creating incidents, commenting, and tracking progress).
Self-Service Portal main page consists of several areas:
- Header
- Portal Announcements
- Search bar
- Main area

Banner Header
Banner Header is built with the Simple Tree structure mechanism.

This area contains the following elements:
- Quick link to the Cabinet.
- My Tasks – here you can find the tasks assigned to you (incidents, service requests, change requests).
- My Tickets – here you can find the tickets (incidents, user queries) created by you.
- My Approvals – here you can find the tickets that need your approval.
- Assets and equipment – this section lists the assets (services or CIs) that are associated with you.
- (on any page but the main) Search bar – enter the keywords to find the records you need.
- Profile icon – contains the following elements:
- Profile – leads to the page with user information.
- Impersonate – allows imitating other users for impersonator. See the User Impersonation article to learn more.
- Elevate Roles – allows activating a role with Elevated Privilege. See the Role Structure article to learn more.
- Language – allows switching system language of the current user.
- Logout – logs out from the current user profile.
Portal Announcements
This area contains the Announcements block, which broadcasts messages to SSP users. This functionality is used in cases when the administration needs to inform users about any circumstances or events that take place, like service degradation or emergency works.
In SimpleOne, announcements visually differ depending on the Announcement Type:
- Recovery
- Completion Recovery
- Maintenance
- Urgent Maintenance
- General Information
To manage announcements (create, edit, or delete), please navigate to the Service Announcements menu category in the agent interface.
Search bar
The search bar allows you to find the necessary records among the Knowledge Base articles, user queries, incidents, notifications, and tickets.
To add more dictionaries to the search selection, create a new Text Search Table (ts_table) to the Self-Service Portal record in the Text Search Group (ts_group) table. Refer to the Search Configuration article to learn more.
The system searches for keywords and content of tables related to the Self-Service Portal record in the Text Search Group (ts_group) table. A list of matching records is displayed after the search is over.
Global Search supports the use of the following symbols:
~`!@#$%^&*()-_+={}[]|/:;"'<>,.?
The search bar moves to the Banner Header on all pages except the Main Page.
Main area
Blocks of the Main area are built with the Simple Tree structure mechanism.
The main area is intended to be the storefront for a consumer, and it consists of navigation blocks leading to various portal actions and sections:
- My Tasks – here you can find the tasks assigned to you:
- Incidents
- Service Requests
- Change Requests
- Service Catalog – browse the company Service Catalog to find the services and items that fit your needs, and place an order using the appropriate Service Request form as well.
- Knowledge Base – browse the company Knowledge Base to find and read articles.
- Ask a question – here you can submit a user query that cannot be definitely classified as an incident or a service request.
- Create Incident – here you can submit an Incident about any inconvenience with the company service or equipment.
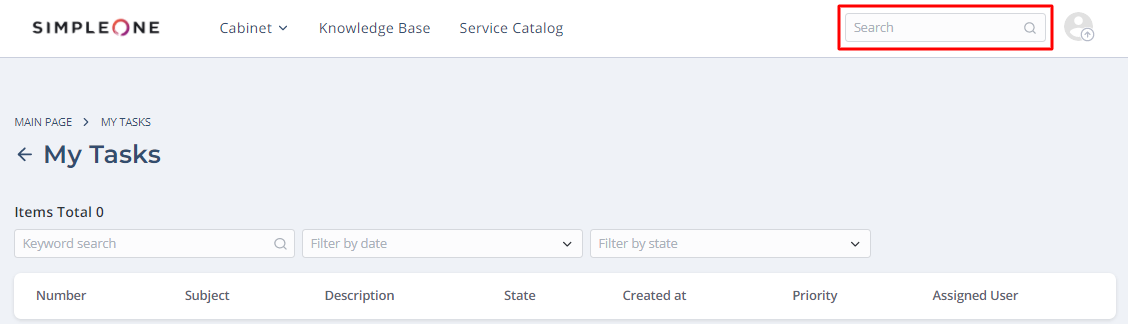
Filters
On the portal, the My Tasks, My CI, My Tickets, and My Approvals pages provide the following tools for filtering records:
- Keyword search
- Filter by date
- Filter by state (Filter by)
![]()
Keyword search
Find a record or records containing specific words or characters using this filter.
- Click on the filter bar.
- Enter the words or characters you need.
- Press Enter on your keyboard to apply the filter.
![]()
Filter by date
Find records created on a specific day or within a specific period of time using this filter.
- Click on the filter bar to open the datetime picker.
Click on the calendar icon
 to select a date.
Click Add an interval to select a period of time within which a record was created: select the Start and End dates of the interval.
Click Delete the interval to go back to selecting one date.

- Click Apply to apply the filter.
Filter by state
Find records in a specific state using this record.
- Click on the filter bar.
- Choose one or more options by selecting the checkboxes at the left.
- Click on the operation area to apply the filter.

To unselect the options:
- Click on the filter bar and clear the checkbox you need.
Click the cross icon
 at the right of the option.