Depending on your needs and business processes, you can assign tasks to agents in two ways:
- manually by specifying the values of the Assignment Group and Assigned User fields.
- using the task auto assignment engine.
The engine allows automating task assignments by various criteria, defined by conditions and assignment types, and implementing business logic before a task is assigned. Tasks auto assignment allows balancing employee workload and creating different rules for different kinds of tasks.
Manual Assignment
The out-of-the-box application has preconfigured restrictions for assigning users or groups depending on the values of relevant fields. The reference restrictions for Assignment Group and Assigned User fields in Task and ITSM Task tables are defined within the dynamic filters. These filters are stored in the Filter Option Dynamic (sys_filter_option_dynamic) table. From the ITSM Task table, the restrictions are inherited by incident, user query, problems, request, change request tables.
| Dynamic filter | Table | Description | |
|---|---|---|---|
List of users based on assigned group | Task | If you specify an assignment group, you can assign only an Employee that belongs to this group in the Assigned User field. If you do not specify an assignment group, you can select any Employee record in the Assigned User field. | |
List of groups based on assigned user. | Task | If you specify an assigned user, you can only select the group the user belongs to in the Assignment Group field. If you do not specify an assigned user, you can select any group in the Assignment Group field. | |
| List of ITSM_agent on assigned group | ITSM_Task | If you specify an assignment group, you can select only an Employee record with an admin or ITSM_agent role in the Assigned User field. If you do not specify an assignment group, you can select any Employee record with an admin or ITSM_agent role in the Assigned User field. | |
Creating an assignment rule
Role required: admin.
To create a new assignment rule, please complete the steps below:
- Navigate to Auto Assignment → New Rule.
- Click New and fill in the fields.
- Click Save or Save and Exit to apply changes.
Please keep in mind that task auto assignments only trigger new record creation. The auto assignment rules cannot be configured to handle record update events. For example, the auto assignment does not work when the state or any other field value changes.
Autoassignment Rule form fields
| Field | Mandatory | Description |
|---|---|---|
| Name | Y | Assignment rule name. |
| Description | N | Assignment rule description. |
| Table | Y | Specify a table extending from the Task table and containing objects to assign (like incidents, requests, and so on). |
Assignment Type | Y | Specify the assignment type. Available options:
If you use the Load Balancer assignment type, next step is configuring a load balance element. This element defines which tasks to consider "completed". If not defined, the balancer will take into account all task records ever assigned to users. Let us consider a case when a load balance element is not created:
Since the load balancer cannot define which tasks are completed and which ones are not, all new tasks will be assigned to Barbara Wilson because loader will consider John more loaded in comparison to Barbara and will count all tasks assigned to him for 10 years. But if a load balance element defines records in the Closed state as "completed", then the load balancer will ignore these tasks. |
| Assigning to inactive user | N | This field allows you to choose the system response options if the user to which the task should be assigned is inactive. Available choice options:
|
| Warning | Y | Specify the warning message. The default value is "Task is assigned to inactive user". This field only appears if the Display warning option is selected in the Assigning to inactive user choice list. |
| Condition | Y | Create conditions to meet before the assignment rule is triggered. Use the Condition Builder to configure a filter that fits your needs. You can create complex AND and OR filters, with more than one condition in one filter. If you need to configure a general rule (for example, assign all tasks to a specified employee), then use a workaround by specifying a common condition like: Сondition ID is not empty |
| Assigned Group | Y | Specify the responsible group for this kind of tasks. If several groups can work on a task, add a relevant condition, for example: When a responsible group is assigned, then the Assigned User field becomes non-mandatory. |
| Assigned User | Y | Specify the person responsible for this kind of tasks. This field only appears when the Custom option in the Assignment Type field is selected. When a responsible user is assigned, then the Assignment Group field becomes non-mandatory. |
| Active | N | Select this checkbox to make this rule active or inactive. |
| Use Script | N | Select this checkbox to specify the script implementing the advanced assignment logic. You can script actions for assigning users and/or groups. This checkbox only appears when the Custom option in the Assignment Type field is selected. |
| Watcher | N | Reference to a business rule containing the assignment logic (conditions, groups, and so on). This rule is automatically created when the form is saved. Also, the relevant field is populated with the business rule ID automatically, too. You can manage this business rule later in an appropriate section (System Settings → Business Rules). |
| Group Script | N | Specify a script implementing an advanced logic for a group assignment. This field appears when the Use Script checkbox is selected. |
| User Script | N | Specify a script implementing an advanced logic for a user assignment. This field appears when the Use Script checkbox is selected. |
The server-side business logic may not work for system tables if the creation or updating of records is initiated by the backend. For example, an Import Set is created as part of loading an Import Source, or an Email is created as a result of a notification rule, and so on.
A list of table examples for which server-side business logic may not work:
- Main Log (sys_log)
- Script Log (sys_log_script)
- Exception Log (sys_log_exception)
- Record Deletion Log (sys_record_deletion_log)
- Import Set (sys_import_set)
- Activity Feed Item (sys_activity_feed_item)
- Email (sys_email)
Load Balancer Elements
If you are creating a Load Balancer assignment type, you should define which tasks will not be taken into account while evaluating the team's load. You should exclude the completed tasks. To do this, complete the steps below:
- Open the auto assignment rule for the Load Balance type.
- Scroll down to the Related Lists area.
- Open the Load Balance Element tab.
- Click New and fill in the fields.
- Click Save or Save and Exit to apply changes.
The alternative way to create a load balance element is the following:
- Navigate to Auto Assignment → Load Balance Elements.
- Click New and fill in the fields.
- Click Save or Save and Exit to apply changes.
Load Balancer Element form fields
| Field | Mandatory | Description |
|---|---|---|
| Auto Assignment Rule | Y | Reference to the auto assignment rule for which this configuration is to be done. If you create an element out of the related list, this field is populated automatically. |
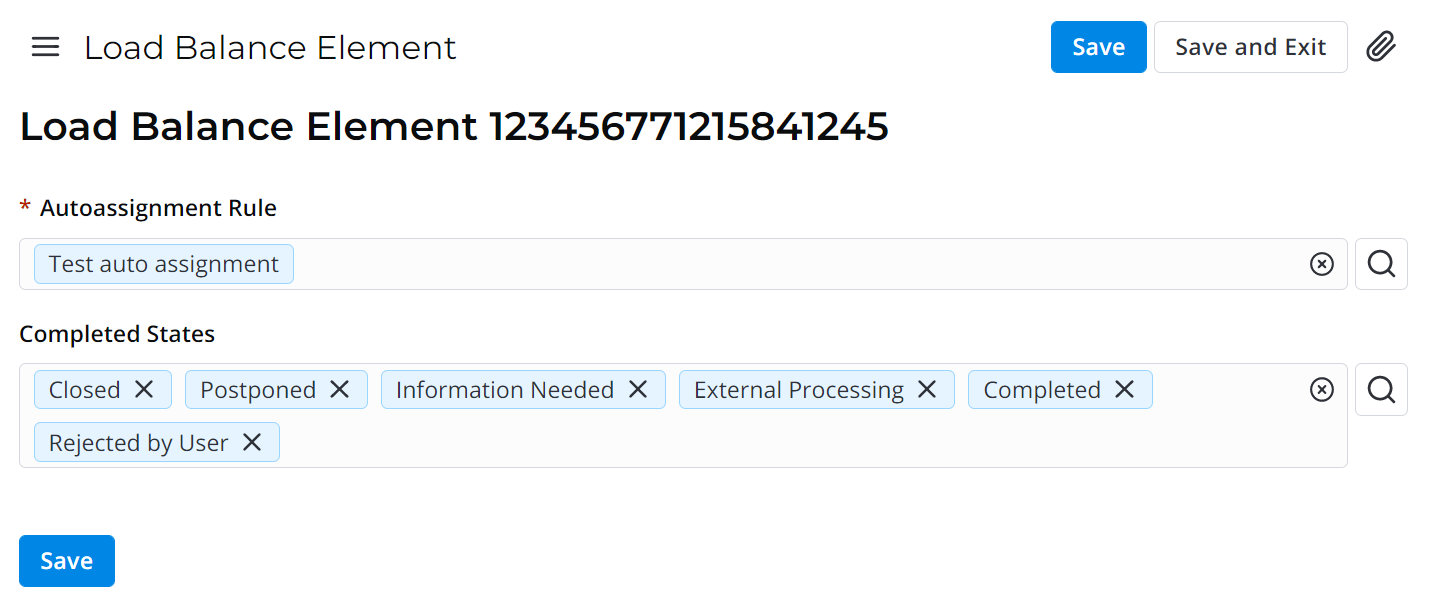
| Completed States | N | Specify the states that can be defined as "completed". All other states related to this rule will be considered "incomplete". You can specify more than one state in this field. |
You can find an example with filled fields in the screenshot below.
Round Robin Elements
Round Robin Element stores information about the next group member to be assigned to a task. The count starts with "0" (group member 1). When the Current User Count field value is equal to "1", it means that the next task will go to group member 2.
Unlike the load balance element, the system will create a relevant element automatically once the auto assignment rule is executed. That us, the round robin element is not obligatory to create manually.
To create a round robin element, complete the steps below:
- Navigate to Auto Assignment → Round Robin Elements.
- Click New and fill in the fields.
- Click Save or Save and Exit to apply changes.
Round Robin Element form fields
| Field | Mandatory | Description |
|---|---|---|
| Autoassignment Rule | Y | Reference to the auto assignment rule from the dictionary (one created earlier). |
| Current User Count | Y | This value defines which user is to be assigned to the next task. Please note that "0" here stands for the first employee in the queue. |
Absences and auto assignments
The auto assignment engine works in collaboration with the personal schedule engine. If an agent is absent (on vacation, for example), they will not be assigned to a task. For this, the absence record should be created and approved by the person.
Personal Schedule is a separate application that is not included into a standard box. Make sure that you have the application installed. If not, please purchase the application pack from your vendor and install it as described here.
To create a new absence record, please complete the steps below:
- Navigate to Personal Schedule → All Absences.
- Click New and fill in the fields.
- Click Save or Save and Exit to apply changes.
Absence form fields
| Field | Mandatory | Description |
|---|---|---|
| Number | Y | Absence record number. This field is read-only and always populated automatically. |
| Employee | Y | Specify an employee for whom you need to record an absence. |
| Manager | Y | The name of the employee manager will appear automatically in the field after saving the record. This person is responsible for the absence approval. |
| Type | Y | Specify the absence type. Available options:
|
| Description | N | Optional record description. |
| State | Y | Absence stated. Available options:
Absences will not be taken into account until they are not in the Approved state. Unless they are not approved, tasks may be assigned to the agent requested for the absence. |
| Start Date Time | Y | Specify the absence start date. |
| End Date Time | Y | Specify the absence end date. |
| Days count | Y | This field is populated automatically and represents the absence duration in days. |