Notifications keep you updated on the new records, changes, and events in SimpleOne platform. Changes in any field of a task or a whole table may trigger outgoing notification emails. Use notification rules described below to define who receives information about particular changes in the system, and the scope of that information.
SimpleOne has a set of out-of-the-box notifications: see the Available Notifications article to learn about them.
Notification rules
Notification rules are used when you need to set up notification sending rules, depending on various conditions, or in case of the event happened.
You can create new notification rules, or modify existing ones.
Role required: notification_admin.
To create a notification rule, complete the steps below:
- Navigate to the System Notification → Notification Rules.
- Click New and fill in the fields.
- Click Save or Save and Exit to apply the changes.
You can also create a notification rule through a form or a related list:
- Open the hamburger menu
 .
. - Proceed to Configure → Notification Rules.
- Click New and fill in the fields.
- Click Save or Save and Exit to apply the changes.
Notification Rule form fields
| Field | Mandatory | Description |
|---|---|---|
| Name | Y | Displayed notification name. |
| Table | Y | Choose the target table for notifications. For example, if you create a notification for some Incident, then select the Incident table. |
| Active | N | Select this checkbox if you need to activate this notification rule. |
| Inherited | N | Select this checkbox if this notification rule should be applied to child tables of the selected table. For example, if you select the Task table, then this rule applies to the Incident, Problem, Change Request and other child tables of this table. |
| When to Send tab | ||
| Conditions | N | In this field, you can specify a condition to meet before sending the notification. Use the Condition Builder to build a filter that will fit your needs the best. An empty condition always returns true. |
| Send when | Y | The option-driven field providing the choice when the notification should be sent. Available choice options:
|
| Inserted | N | Select this checkbox to send the notification when a record is inserted into the table specified in the Table field. |
| Updated | N | Select this checkbox to send the notification when a record is updated in the table specified in the Table field. |
| Event | Y | Event is a special record used by the system to log when specified conditions met and to take some kind of action in response to the conditions. This field appears when the Event is fired option is selected in the Send when field. |
| Who will Receive tab | ||
| Other recipients | N | In this field, you can add contacts to subscribe to the incident activities. Available values in this field:
The value in this field can be combined out from the options above. For example:
Please check your template strings along with the system before production using. For example: The |
| Users | N | In this field, you can list the users who will receive the notification within this rule. In case the user or user's email is defined twice in the Other recipients and Users fields, the system will send only one message. |
| Send to self | N | Select this checkbox to send the notification to the person initiating notification sending if this person is in the recipient list. Otherwise, notification initiator address would be excluded from the To field of notification email. There are some nuances about this functionality: |
| Exclude delegates | N | Select this checkbox to ignore the notification rule for delegates. |
| What will Contain tab | ||
| Subject | N | The displayed notification subject. Notification variables and placeholders are supported there. |
| Notification template | N | Select the relevant notification template from the list. |
| Message | N | The notification body in plain text. Notification variables and placeholders are supported there. |
| Message HTML | N | The notification template in rich-text format. This field supports HTML tags, placeholders, notification variables. You can also use notification variables |
The server-side business logic may not work for system tables if the creation or updating of records is initiated by the backend. For example, an Import Set is created as part of loading an Import Source, or an Email is created as a result of a notification rule, and so on.
A list of table examples for which server-side business logic may not work:
- Main Log (sys_log)
- Script Log (sys_log_script)
- Exception Log (sys_log_exception)
- Record Deletion Log (sys_record_deletion_log)
- Import Set (sys_import_set)
- Activity Feed Item (sys_activity_feed_item)
- Email (sys_email)
Use cases
We need to configure a basic notification for the Employee table, which implements the following logic:
- When a new employee is added, all employees receive a notification.
We create a notification rule as below:
| Field | Value |
|---|---|
| Name | New employee |
| Table | Employee |
| Active | True |
| When to Send tab | |
| Send when | Record inserted or updated |
| Inserted | True |
| Who will Receive | |
| Other recipients | |
| What will Contain | |
| Subject | New employee in the ${current.department} department |
| Message | ${current.display_name} is in our team! |
Notification template
Notification templates are beneficial to pattern the notification process, being a very flexible tool. They provide a possibility to develop templates for different tasks and cases.
To create a notification template, complete the steps below:
- Navigate to the System Notification → Notification Templates.
- Click New and fill in the fields.
- Click Save or Save and Exit to apply the changes.
Notification Template form fields
| Field | Mandatory | Description |
|---|---|---|
| Name | Y | Displayed notification template name. |
| Table | Y | If the table is specified, then the template will be applicable only for this table; otherwise, it will be applicable for all tables. |
| Subject | Y | Notification template subject. Notification variables and placeholders are supported there. |
| Message Text | N | The notification template in plain text format. Notification variables and placeholders are supported there. |
| Message HTML | N | The notification template in rich-text format. This field supports HTML tags, placeholders, notification variables. You can also use notification variables |
Notification variables
Specify a notification variable using this syntax:
${variable-name.variable-parameters}
Notification variables
| Variable | Description | Example |
|---|---|---|
| ${current} | This variable refers to the current record in the table specified. | ${current.caller} – for example, if this variable was used in the Notification Rule in the Other field in the Who will receive tab, then the notification will be sent to the caller (the originator of the issue). |
| ${event} | This variable refers to the specified event context in case if the notification was triggered by some event. So, as you have got this context, you can get the values of the fields within the Event (sys_event) table related to this event. | ${event.param_1} |
| ${script} | This variable runs the specified script developed by using the Notification Scripts functionality. The called script name should not contain spaces. They are not allowed to use within the structure like shown in the example. | ${script:add_an_attachment} |
| ${template} | This variable is used to link the notification template table (sys_notification_template) and the notification rule table (sys_notification_rule). When using it, you can stuff the template fields to the relevant notification rule fields. | ${template.template_name} – for example, if this variable was used in the Subject field, then the subject line stored in the template will be applied to the relevant field. |
| Variables that allow displaying links to current record | ||
${URI} | The link text is the unclickable link to the record. | ${URI} Source: Click here to view the task: ${URI} ${URI} Output: Click here to view the task: https://instance.example.com/record/task/160525805616015648 |
| ${URI_REF} | The link text is the display value of the record. | ${URI_REF} Source: Click here to view the task: ${URI_REF} ${URI_REF} Output: Click here to view the task: TSK0005555 |
Notification scripts
Use the notification scripts to dynamically change the parameters of the outgoing messages using the SimpleEmailOutbound class.
You can use the same script in multiple email notifications and notification templates. To do so, add a ${script:script_name} embedded script tag to the notification rule or to the related notification template. The fields below are available for the script embedding:
- Subject
- Message
- Message (HTML)
- Other
To create a notification script, complete the steps below:
- Navigate to System Notification → Notification Scripts.
- Click New and fill in the fields.
- Click Save or Save and Exit to apply the changes.
Notification Script form fields
| Field | Mandatory | Description | ||||||||||
|---|---|---|---|---|---|---|---|---|---|---|---|---|
| Name | Y | Desirable script name for later usage in notifications and templates. Should not contain spaces. | ||||||||||
| Script | Y | Enter the script using SimpleOne server-side API, particularly, the SimpleRecord Server-Side, SimpleEmailOutbound and SimpleTemplatePrinter classes.
|
To receive the values of the current and event objects, use dot-notation to address the properties relating to the column names and the current and sys_event tables. See the example below:
(function runNotificationScript(
    /* SimpleRecord */ current,
    /* SimpleTemplatePrinter */ template,
    /* SimpleEmailOutbound */ email,
    /* SimpleRecord */ event
    ) {

    email.setSubject(current.number + '- additional comment has been added');
    email.setBody(`A comment from: ${event.sys_created_by.display_name}: "${event.param_2}"`);

    if (current.days_count > 3 && !current.requester.vip) {
        email.addAddressCc(current.requester.email, current.requester.display_name);
    }

})(current, template, email, event);
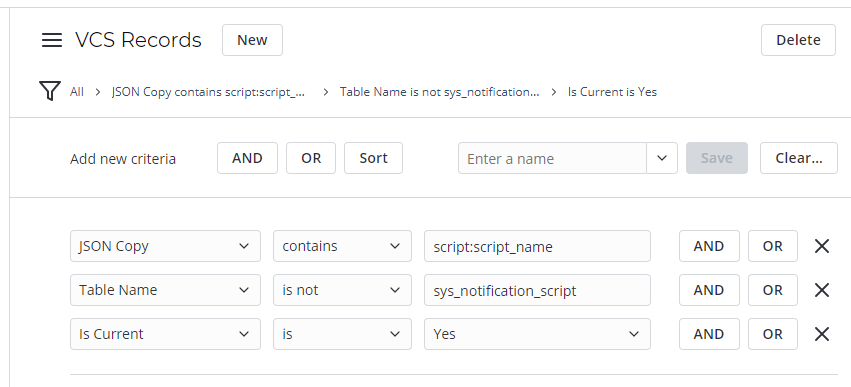
To locate where notification scripts are used, perform search against the version list. To do so, complete the steps below:
- Navigate to Configuration Pack → VCS Records.
- Click on the funnel icon
 on the top to open the Condition Builder.
 - Create a filter containing the conditions listed below:
- JSON Copy CONTAINS script:script_name
- Table Name IS NOT sys_notification_script
- Is Current IS Yes.
In step 3a, specify your script name after the "script:" declaration. For example, "script:stop_notifications".
The selection example is given on the screenshot below.