Role required: admin.
A local pack is a record in the VCS Local Pack (sys_vcs_local_pack) table compiling relevant records from the VCS Record (sys_vcs_record) table. Use it to associate VCS records with a particular pack and export them as a complete set. By means of the local packs, it is possible to develop application configurations on a separate instance, export them as a .SOP file, and implement the changes to another instance.
See the Configuration Packs article to learn more.
For configuration pack export, the following elements are used:
- Local Pack – compiles all relevant VCS records, so that they are linked as a complete set. These records can be implemented as one configuration pack in another instance. In other words, a local pack collects references to the records that will be changed, inserted, or deleted on the target instance.
- VCS Record – contains a record version.
- .SOP file – a physical file in the .SOP format. It contains all record versions from the completed local pack. Implement it on any other SimpleOne instance.
Assembling a local pack
Local pack configuration and export include the following stages:
- Configuring VCS records in a local pack:
- restoring records (optional)
- moving records (optional)
- Merging several local packs (optional).
- Exporting a .SOP file.
When exporting records for a custom application, ensure that the relevant application is implemented in the target instance or that the local pack contains the application VCS record.
Team Development
In SimpleOne, you can export separate local packs and upload them one by one. Another option is to work as a team on one task. To do so, developers should do their part of work in separate local packs and then combine the results into the team's final pack. The process scheme is described below:
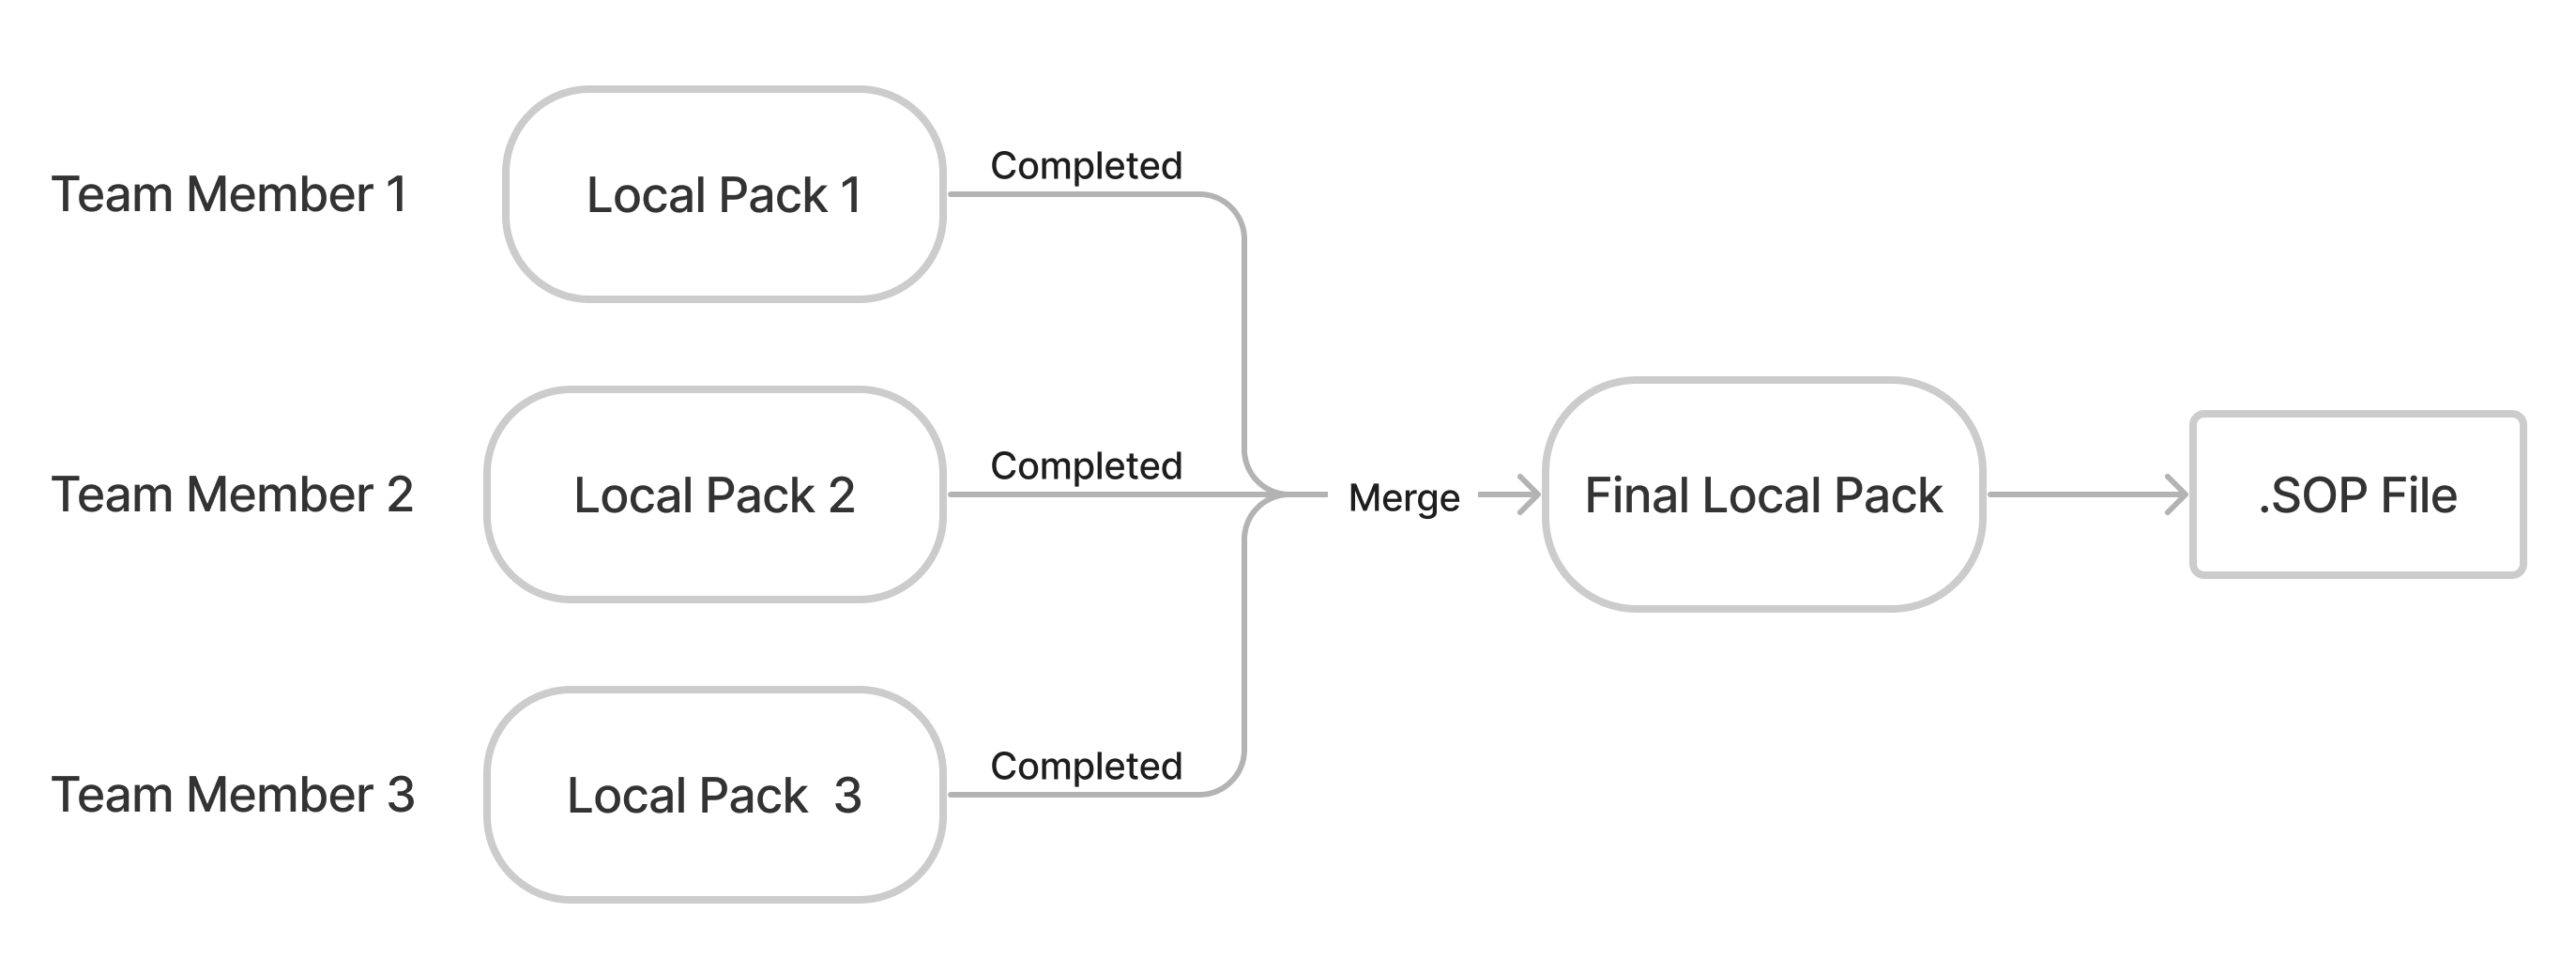
Briefly, to facilitate the team development process, perform the following steps:
- Every team member creates a separate local pack and works within it collecting necessary records. The results go into separate local packs.
- When the assembling is over, these local packs must be merged into the final one.
Create a local pack
To create a local pack, complete the steps below:
- Navigate to Configuration → Local Packs.
- Click New and fill in the fields.
- There are two ways to apply changes and continue assembling a local pack:
- Click Save. Then click Set current to switch the local pack in the Admin Preferences menu and start working on it.
- Click Set current and Save to switch the local pack in the Admin Preferences menu, apply changes and start working on it.
Managing VCS records
Configure the set of record versions in the VCS Records related list to build the local pack. Restore and move records to collect only those you need.
Restoring a VCS record
To restore one of the previous record versions, make it actual by clicking Restore Version. Actual records are marked with the Is current checkbox selected. Thus, restoring is available only to the VCS records with the cleared Is Current checkbox.
Restoring is unavailable for the records with the Protected record policy and related to the Simple application.
To restore a record version, complete the steps below:
- Open the record you need.
- Scroll down to the Related Lists area and open the VCS Records tab.
- Open the record version to restore.
- Click Restore Version.
Another way to restore a record version is the following:
- Navigate to Configuration → VCS Records.
- Find the record to be recovered. You can use list search boxes or the Condition Builder.
- Open the record you need.
- Click Restore Version.
After that, a new VCS record is created in the current local pack.
Removing a VCS record
VCS records cannot be deleted; therefore, they are moved to the default local pack. If your local pack contains a VCS record that is created accidentally or belongs to another configuration pack, you can remove it from this local pack.
To move a VCS record, do the following:
- Navigate to Configuration → Local Packs.
- Open the local pack containing the VCS record you need to move.
- Scroll down to the Related Lists area and open the VCS Record tab.
- Select a record or records to be moved using the checkboxes and click Move to Default.
- These records will be moved to the default local pack of the same application.
As a result:
- All selected record versions are moved to the default pack.
- All record versions with the same Record ID as the selected ones are moved to the default pack, too. That is, all previous and current versions of the same record are moved.
This option is not available in default local packs.
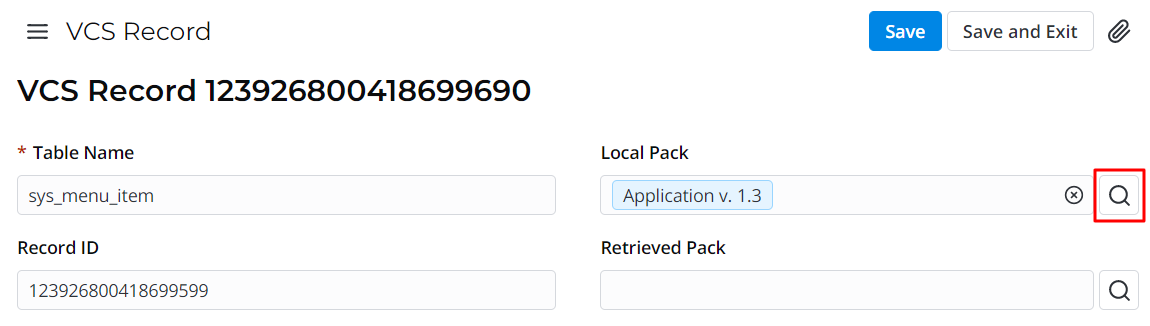
Changing local pack for a VCS record
If a version was created in a wrong local pack by mistake (for example, in the default local pack), you can move it to the required local pack. To do so, complete the steps below:
- Navigate to Configuration → VCS Records.
- Find a record to recover. You can use list search or the Condition Builder.
- Open the record you need.
- Click the magnifier icon
 by the Local Pack field and choose the desired local pack.
 - Click Save or Save and Exit to apply changes.
Snapshots
Snapshots restore record versions in the following cases:
- a record lacks current versions
- the current version of a record is outdated – when the JSON Copy of this record version has a later date than the Updated at field of the record itself.
In version control systems (VCS), a snapshot is a fixed system or database status description.
There are two ways to create a table snapshot:
- via table managing form (table configuration)
- with a server-side API class SimpleVcs.
Option 1
- Navigate to System Definition → All Tables.
- Using the search bar and/or a Condition Builder, find the table for which you want to create a snapshot, and navigate to it.
- Open the hamburger menu and navigate to Configure → Table.
- Click the Create VCS snapshot button at the right top. This button is visible only when the versioning for this table is on (the Is VCS Enabled checkbox is selected).
Option 2
- Navigate to System Definition → Scripts.
- Write down a script and call createTableSnapshot(tableName) method in it.
The example script below makes snapshot of all versioned tables within the current application:
const table = new SimpleRecord('sys_db_table');
table.addQuery('is_vcs_enabled', true);
table.addQuery('sys_id', '!=', '999999999999999998'); // exclude REM
table.selectAttributes('name');
table.query();
while (table.next()) {
  const vcs = new SimpleVcs();
  const versionCount = vcs.createTableSnapshot(table.name);
  if (versionCount > 0) {
    ss.info(`${table.name.padStart(80, " ")}: ${versionCount} versions created`);
  }
}
Completing local packs
To complete local packs, complete the steps below:
- Click on the gear icon
 at the top right to enter the Admin Preferences menu.
 - Select your application in the Application choice list.
- Click the icon
 on the right to the Local Pack choice field.
 - Change the value of the State field to Completed.
- Click Save or Save and Exit to apply the changes.
- Click the Export Local Pack button to download the application, so it can be installed on different instances. See the Configuration Packs article to learn more.
Another way to open a local pack record is the following:
- Navigate to Configuration → Local Packs.
- Open the record you need to complete and export.
- Change the value of the State field to Completed.
- Click Save or Save and Exit to apply changes.
- Click the Export Local Pack button to download the application, so it can be installed on other instances.
Note that, when you develop an application, the records created in the pipeline of another application are unavailable for updating (either editing or deleting). Any attempt to modify a record related to another application causes a warning message.
To perform any actions with a record, switch to the application it belongs to.
For more information about switching between the applications, see the Admin Preferences article.
/