Configuring the form layout allows changing the form appearance. You can configure how fields are placed on the form (this is what it is form layout); also, you can configure related lists layout.
These settings allow tweaking the form for the different business tasks, for example, creating separate forms and lists for different processes or user roles.
Form layout allows us to show or hide elements; allows grouping them into sections.
Form layout view
To change a form layout, follow the steps below:
Open the form you need to reconfigure;
Enter the hamburger menu on the left side at the bottom of the page;
Select Configure -> Form Layout;
You will see a form layout view with two slushbuckets.
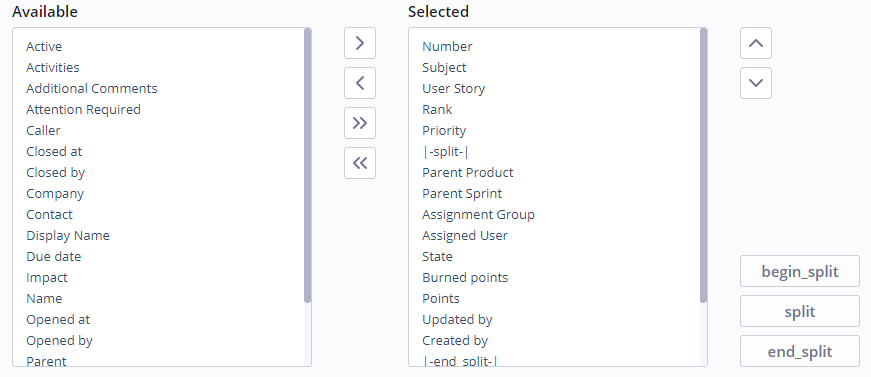
To add elements into the form, move the desired fields from the left slushbucket to the right one with the ">" button. You can add all the fields by clicking the ">>" button. When you’re done, click Save;
To remove elements from the form, move the needless fields from the right slushbucket to the left one with the "<" button. You can remove all the fields by clicking the "<<" button. When you’re done, click Save;
To change fields order on the form, move them up and down with the appropriate button at the left of the form. When you’re done, click Save.
Splitting the form
By default, fields on the form go from top to bottom in one column. If you need to rearrange them, for example, in two or more columns, then you can use splitters for this.
Decide the first and the last fields of the new column;
Enter the form layout view;
Click the Split button. The splitter created will appear at the bottom of the list;
Using UP and DOWN buttons, move it, so it is over the first field of the column;
Click the End Split button. The splitter created will appear at the bottom of the list;
Using UP and DOWN buttons, move it, so it is under the last of the column;
Click the Save button at the top of the page.
You can make a single field to take up a whole line. For this, you need to put it into a separate block built by the splitters.
The guidelines are similar to the listed above, except for item 3. You need to use the Begin Split button instead of the Split button.
Sections
Each field is an element of the form. The element can be grouped into sections. Sections are needed for separating the fields in sensible and visual way. To create a section and fill it with fields, follow the steps below:
- Open the form you need to reconfigure;
- Click Add New in the Form view and section area (in the Section field);
- Click on the section created;
- Fill it with fields using slushbuckets;
- Click Save at the bottom of the page.
Your newly created section will be displayed on the form.
Positioning the sections
You can change sections order by clicking UP and DOWN buttons at the right of the Form view and section area,
Related Lists
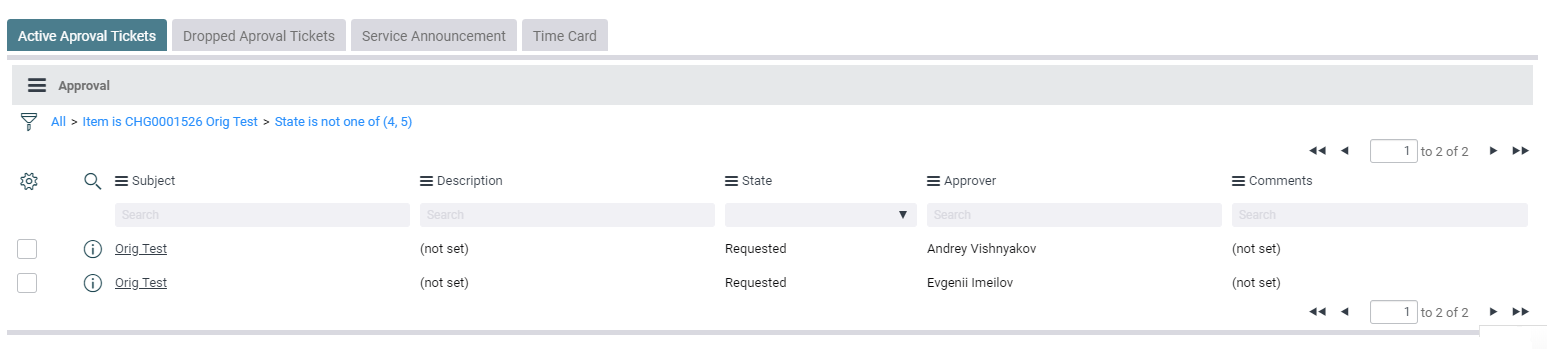
Related lists appear on forms and show records in tables that have relationships with the current record. For example, on the change request form, related lists can display approval tasks lists; on the incident form, they can display SLA indicators with the relevant values, and so on, depending on the business needs.
To configure related lists, complete the steps below:
- Open the form you need to reconfigure;
- Enter the hamburger menu on the left side at the bottom of the page;
- Select Form Layout → Related Lists.
You can add or remove related lists similar to the fields.
Filtered related lists
In SimpleOne, apart from regular related lists, there are also filtered related lists presented. Their difference is that in the filtered related list, you can set the criteria for selecting the information to be displayed.
For example, for the related list on your change request, you may need a selection of all active approval tickets (that are not in Not Rejected or Cancelled state).
Then you need to complete the steps below:
- Navigate to the System Definition → Filtered Related Lists;
- Click New, fill in the fields, and then click Save.
Filtered related lists form description
| Field | Description |
|---|---|
| Name | This name will be displayed on the tab title on the form view. |
| Apply to | The table |
| Query to | Specify a table to apply the query from the Query with cell. |
| Query with | The script containing selection. |
And results of the selection are shown below:
Apply to - на форме какой таблицы будет отображаться данный синтетический связанный список