Configuring the form layout allows changing the form appearance. You can configure how fields are placed on the form (this is what it is form layout); also, you can configure related lists layout.
These settings allow tweaking the form for the different business tasks, for example, creating separate forms and lists for different processes or user roles.
Form layout allows us to show or hide elements; allows grouping them into sections.
Form layout view
To change a form layout, follow the steps below:
Open the form you need to reconfigure;
Enter the hamburger menu on the left side at the bottom of the page;
Select Configure -> Form Layout;
You will see a form layout view with two slushbuckets.
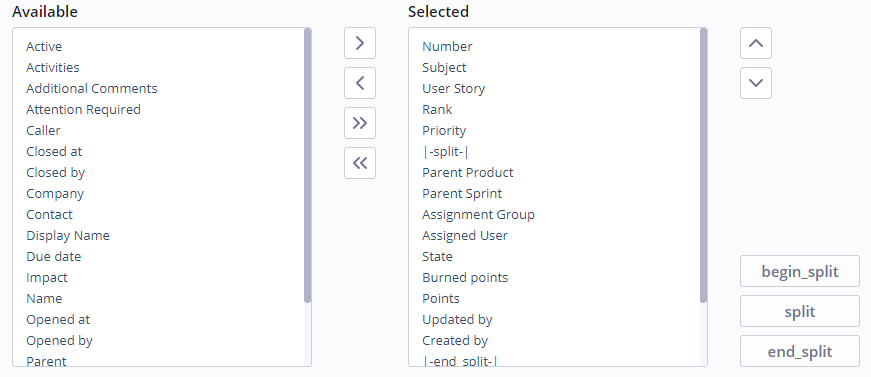
To add elements into the form, move the desired fields from the left slushbucket to the right one with the ">" button. You can add all the fields by clicking the ">>" button. When you’re done, click Save;
To remove elements from the form, move the needless fields from the right slushbucket to the left one with the "<" button. You can remove all the fields by clicking the "<<" button. When you’re done, click Save;
To change fields order on the form, move them up and down with the appropriate button at the left of the form. When you’re done, click Save.
Splitting the form
By default, fields on the form go from top to bottom in one column. If you need to rearrange them, for example, in two or more columns, then you can use splitters for this.
Decide the first and the last fields of the new column;
Enter the form layout view;
Click the Split button. The splitter created will appear at the bottom of the list;
Using UP and DOWN buttons, move it, so it is over the first field of the column;
Click the End Split button. The splitter created will appear at the bottom of the list;
Using UP and DOWN buttons, move it, so it is under the last of the column;
Click the Save button at the top of the page.
You can make a single field to take up a whole line. For this, you need to put it into a separate block built by the splitters.
The guidelines are similar to the listed above, except for item 3. You need to use the Begin Split button instead of the Split button.
Sections
Each field is an element of the form. The element can be grouped into sections. Sections are needed for separating the fields in sensible and visual way. To create a section and fill it with fields, follow the steps below:
- Open the form you need to reconfigure;
- Click Add New in the Form view and section area (in the Section field);
- Click on the section created;
- Fill it with fields using slushbuckets;
- Click Save at the bottom of the page.
Your newly created section will be displayed on the form.
Positioning the sections
You can change sections order by clicking UP and DOWN buttons at the right of the Form view and section area,
Related Lists
Related lists
Related lists (связанные списки) используются для отображения связи текущего объекта с другими объектами. Например, на форме запроса на обслуживание с помощью связанных списков могут быть отражены списки approval tasks, на форме инцидента могут быть отражены списки индикаторов SLA с соответствующими показателями, и так далее, в зависимости от потребностей бизнеса.
Related lists appear on forms and show records in tables that have relationships to the current record.
Для настройки related lists необходимо:
- Откройте запись, которую хотите настраивать:
- Зайдите в бургер меню, Configure -> Related Lists.
Из списка в левой панели с помощью кнопки > добавьте желаемый related list в правую панель и нажмите Save.
К форме можно прикреплять не только обычный related list, но и синтетический связанный список. Отличие ССС от обычного списка в том, что в ССС можно задавать критерии для выборки информации для отображения.
Отличие синтетических связанных списков от релейтед листов в том, что в ССС можно указывать кондишены, делать выборки
Zhulanov Aleksandr [6:16 PM]
существует синтетический связанный список
https://dev.simpleone.ru/record/sys_related_list_script/155964310500000003
Name - название списка(таба) на вкладке Related List
Apply to - на форме какой таблицы будет отображаться данный синтетический связанный список
Query from - к какой таблице будет применяться запрос Query with
Query with- выборка
В данном фильтре это выборка approval тикетов из таблицы Approval для текущего изменения в активном состоянии (Not Rejected or Cancelled)
Результат на изменении (edited)
image.png
https://dev.simpleone.ru/record/itsm_change_request/156049743200563240
Igor Shakhbazyan [6:18 PM]
пока не очень вкуриваю, в чем его отличие от обычного релейтед листа
Zhulanov Aleksandr [6:18 PM]
то есть можно вывести не просто все аппрувал тикеты для данного изменения но и еще указать статус
Igor Shakhbazyan [6:18 PM]
не синтетического
Zhulanov Aleksandr [6:19 PM]
то есть это не просто релейтед лист, а релейтед лист с преднастроенным фильтром
Igor Shakhbazyan [6:19 PM]
не очень догоняю отличие концепции ССС от обычных релейтед листов