An indicator is a rule of a time counter activation that is specified by proper conditions for starting, pausing, and stopping this counter. It also determines a time limit for declaring SLA as breached and contains time conditions of a Commitment type implementation.
For example, you can create separate SLA indicators for incidents having an impact from "Low" to "Very High" and set a separate "Breach Time" value for them, based on your SLA agreement.
When an indicator starts, the system automatically generates an Indication, which is a time counter that tracks current timings and time points of the target service level commitment.
Role required: service_level_manager.
Indicator
To add a new Indicator, please complete the steps below:
- Navigate to the Service Level Management → Indicator menu.
- Click New and fill in the form.
- Click Save or Save and Exit to apply changes.
The Indicator form
Field | Required | Description |
|---|---|---|
| Name | Y | An indicator name. Please do not give the similar name to indicators when creating them against the same table; otherwise, they will work incorrectly if edited or deleted later. |
| Agreement | N | Specify an agreement related to this indicator containing tracking metrics. |
| Commitment Type | N | Specify a commitment type for this indicator. Available options:
|
| Table | Y | In this field, select a task-based entity (Incidents, Problems, Requests) applied to define conditions of the Indicator attachment. |
| Inheritance | N | Select this checkbox if you are creating an indicator on a parent table and it is necessary to use it against all of the child tables. Example The Service Requests table can be considered as a parent table, and every table extending it is a single service request. Turning this attribute on, you can create a single indicator on a parent table which will affect every child table created. |
| Parent Dependency Column | N | In this field, you can specify a column in case you need to build "parent-child" dependencies between indicators. |
| Active | N | Select this checkbox on to make the indicator active or inactive. |
| Duration | Y | The length of time the SLA runs before it is marked Breached. Please note that all day duration (not only business hours) according to the chosen schedule is taken into account. See the calculation samples below this table. |
| Schedule | Y | A working schedule selected from the list. It determines working hours that the system uses when calculating an actual duration of the Commitment implementation under certain conditions. To configure this timeline, use the Schedules features. |
| Timezone | Y | Determines an indicator Timezone. |
| Timezone Source | Y | Select one of the available records from the drop-down list if you need to specify a special timezone bond. The default value is Indicator's timezone. Available options:
|
Indicator inheritance
Please keep in mind that if you create an inherited indicator on a parent table, and after that a separate indicator on a child table, the indications are to be created only for a child table.
Also, when creating an inherited indicator against a parent table, please keep in mind that the extended attributes from child tables will not be available there. See the brief illustration below:
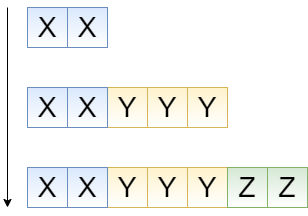
On this picture, the table set is displayed:
- The parent table, attribute set XX
- The child table 1, attribute set XXYYY
- The child table 2, attribute set XXYYYZZ
Considering the fact that the attribute inheritance is going top-down, the table attributes (such as fields) that extend parent table will be inaccessible on the lower level. Please note that when configuring conditions of your indicator, make all critical attributes accessible on the top level.
Duration calculations
Example 1.
Company A uses schedule "24x7", which means 24 working hours, 7 days a week, around-the-clock shift-working, as an example. In this case, if you enter "2" into the days field, this value is converted to 48 working hours or 2 working days. Nothing extraordinary.
Example 2.
Company B uses schedule "8x5", which means 8 working hours, 5 days a week, one of the most common working schedules. In this case, if you enter "2" into the days field, this value is converted to 48 hours (because there are 24 hours in a day), which gives 6 working days.
Specifying indicator conditions
Field | Required | Description |
|---|---|---|
| Start Conditions | Y | Establish conditions with the Condition Builder to make the Indicator start. The system uses the Table fields as transactional data to verify the conditions. When the transactional data changes, the system checks these conditions. E.g., for incidents, it is appropriate to use "Impact" as a condition field with one of the possible values - "Low", "Medium", "High", "Very High". The When to cancel setting allows to establish a condition for start cancellation by one of the options below:
|
| Pause Conditions | N | Establish conditions with the Condition Builder to make the Indicator pause. The system uses the Table fields as transactional data to verify the conditions. When the transactional data changes, the system checks these conditions. E.g., for incidents, it is appropriate to use "Impact" as a condition field with one of the possible values - "Low", "Medium", "High", "Very High". The When to resume setting allows to set a condition for pause resumption by one of the options below:
|
| Complete Conditions | N | Establish conditions with the Condition Builder to make the Indicator stop. The system uses the Table fields as transactional data to verify the conditions. When the transactional data changes, the system checks these conditions. |
| Reset Conditions | N | Establish conditions with the Condition Builder to make the Indicator reset. The system uses the Table fields as transactional data to verify the conditions. When the transactional data changes, the system checks these conditions. |