| Note |
|---|
Role required: change_manager. |
Assigning and Updating Change Requests
How to assign a change request
- Open a change request you need to assign;
- Click a magnifier icon in the Assigned User or the Assigned Group field;
- Select the responsible person or group to assign the change request;
- Click Save or Save and Exit to apply changes.
How to update a change request
- Open a change request you need to update;
- Update the necessary fields;
- Click Save or Save and Exit to apply changes.
Create Change Tasks
If solving of change request requires the participation of different departments, then you can create a Change Task for each of them. They will be related to the parent change request, but not like in the "master-slave" model. The better example is the "parent-child" model.
To create a change task, please complete the following steps:
- Open the change request you want to work on;
- Scroll down the page, then open the Change Task tab;
- Fill in the form:
- Number - filled automatically;
- Change - the change request that is the parent for this task;
- Assignment group - choose a responsible group to assign a task;
- Assignment user - choose a responsible person to assign a task;
Subject - describe the task here in a brief manner;
- Description - put there the detailed task description;
- Type - the type of change task. It can be customized based on the business needs, (for example, Deployment Task, Code Review Task, Documentation Task).
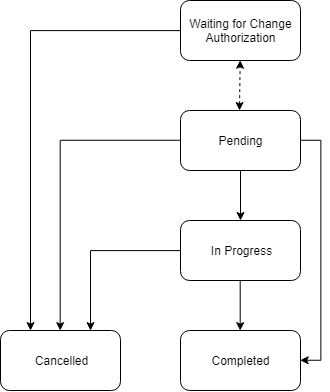
- State - task state. Available choice options:
- Waiting for Change Authorization - this is the initial state for the change task that has been created under the Normal or Emergency Change. After the parent change request is authorized, its change tasks all transit to the Pending state.
- Pending - the task has been scheduled and is waiting for the implementing;
- In Progress - the assignee started working on the task;
- Completed - the task has been completed successfully.
- Cancelled - the task was cancelled due to any reasons (parent change request was not authorized; change task was not described correctly; any other reasons).
- After you have entered task details, specify start and end dates for task implementing.
- Actual Start Date - the date and time when the assigned person started working on this task. The assignee must fill this field;
- Actual End Date - the date and time when the assigned person finished working on this task. The assignee must fill this field;
- Planned Start Date - the date and time when you need the assigned person to start working on this task;
- Planned End Date - the date and time you need this task to be finished (completed and closed).
- Click Save.
| Info |
|---|
You can create as many change tasks as you need. |
Change Task State Model
Create a Change Request Announcement
Create an announcement informing related to the Change Request processed.
To create a Change Request announcement, please click the Create Announcement button in the Change Request form.
In there, two types of announcements are available:
- Maintenance - this type of announcement informs that some service or CI recovery activities are going to be under maintenance in the specified period;
- Urgent Maintenance - this type of announcement informs that some service or CI recovery activities are going to be under maintenance in the nearest time due to high urgency.
Create Relationships
You can create relationships between changes and other types of tasks. For this, please complete the following steps:
- Open the change request you want to work on;
- Scroll down the page, then open the Related Records tab;
- You can create these types of relationships:
- Resolved Incidents;
- Caused Incidents;
- Resolved Problems;
- Caused Problems;
- Related Articles;
- Related Inquiry.
- To create these relationships, please complete the steps below:
- Click a magnifier icon next to the appropriate field;
- In the window appeared choose a necessary option and click Save.
Relationship Types
| Type | Description |
|---|---|
| Resolved Incidents | The incidents specified will be resolved after resolving this change request. |
| Caused Incidents | This change request is the cause of the incidents specified. |
| Resolved Problems | The problems specified will be resolved after resolving this change request. |
| Caused Problems | This change request is the cause of the problems specified. |
| Related Articles | This change request related to the Knowledge Base Articles specified. |
| Related Inquiry | This change request is related to the Inquiry specified. |
| Info |
|---|
The relationship types Resolved Incidents and Resolved Problems To use this feature, please complete the following steps (the procedure is described for the Incidents Resolved, it is the same for the Problems Resolved):
|
Creating Changes out of Problems
When you have investigated a Problem and by result of this you have found a need in a Change, you can create a Change request straight out of the Problem. To do this, please complete the following steps:
- Navigate to Problem Management → All;
- Open the problem you need to work on;
- Enter the hamburger menu on the left side at the top of the page and choose Create Change item;
- Choose the type of the change you need to create (standard, normal or emergency);
- Fill in the fields of the change request, and then click Save.
Creating Changes out of Incidents
When you have fixed an incident and by result of this you have found a need in a Change, you can create a Change request straight out of the Incident. To do this, please complete the following steps:
- Navigate to Incident Management → All;
- Open the incident you need to work on;
- Enter the hamburger menu on the left side at the top of the page and choose Create Change item;
- Choose the type of the change you need to create (standard, normal or emergency);
- Fill in the fields of the change request, and then click Save.
Change Request Authorization
The change requests that are not standard type must go through authorization procedure (the standard change state changes to the Scheduled automatically, without authorization stage).
The authorization is a request approval by Change Authorities of different levels depending on the risk level and probability level. The higher the risk and probability levels, the stricter the authorization procedure.
In SimpleOne, once a change request requiring authorization is raised, it goes to the authorization stage. The state of the request changes to the Authorization. For this, approval tickets should be sent to all necessary authorities depending on the Authority level (see the table below for more information).
In such ticket, every recipient is proposed to approve or reject a request.
If all approval tickets have been approved, then the change request is considered to be successfully approved as well too. The state of the request changed to the Scheduled.
If there is even one approval ticket was rejected, then:
- all other approval tickets must have been rejected automatically too;
- the change request is considered to be rejected and goes back to the authorization stage;
- the state of the request is changed back to Registered.
For the emergency changes, due to their high importance for business services or CI's, the relationship between the Registered and Authorization states is of one-way type. It means that emergency tickets cannot be rejected.
Change Authority level
| Risk level | Change Authority level |
|---|---|
| Low | Local Authorization (authorization by the assigned user) |
| Medium | Change Manager Only |
| High | Basic CAB:
|
| Very High | Complex CAB:
|
| Tip |
|---|
|
Change Templates
You can create a template that can be used later to create change requests with pre-defined tasks. Templates make the processes easier by populating the fields automatically.
You can create a template of any complexity, pre-filling any fields, including assigns. Template can be nested, so you can include change tasks into it if necessary.
Templates can be created in two ways:
- From scratch
- From the change request processed earlier.
Templates can be created for Standard or Normal changes. The difference between these two options that template for Standard change is already authorized, and the change request based on it does not go through the authorization stage. And the template for the Normal change will be created with the Authorization state; so the change request based on it.
To create a change template from scratch, please complete the steps below:
- Navigate to Change Requests → Change Template.
- Click New and fill in the fields.
- Click Save or Save and Exit to apply changes.
Change template form fields
| Field | Mandatory | Description |
|---|---|---|
| Name | Y | Specify a template name. |
| Table | Y | Specify a table |
| Created From Change Request | N | Specify a record ID from which this template was created (if it was). |
| Short Description | N | Specify a short description for this template. |
| State | Y | Available options:
|
| Source task | Y | This field is populated automatically if a template is created out of an existing request. |
| Active | N | Select this checkbox to make a template active or inactive. |
| Template | N | Select fields and specify their values that will be populated in requests created on the basis of this template. |
Closure Information
Basing on the SimpleOne state model, when the change request has been fully processed (scheduled, implemented, and reviewed), it has to be closed. When closing the change request, the responsible person can provide the closure code.
Closure code
This code specifies an option of the closure. SimpleOne has the following options:
| Option | Description |
|---|---|
| Implemented | This state displays that the change request was fully implemented. |
| Partially Implemented | This state displays that the change request was implemented with some exclusions that do not affect the critical functionality of the service. |
| Not Implemented | This state displays that the change request was not implemented. |
| Cancelled | This state displays that the change request was cancelled because of authorization failed or revoked by the caller. |
| Backout | This state displays that the change request implementation was not successful, and the previous state of service (or CI) was restored. |
Planning and Scheduling
Change request implementing must be planned and scheduled carefully. It is very significant for the successful request implementing. Also, planning and scheduling allows to minimize vital business functions disruption.
When scheduling the change request implementing, it is recommended to avoid time overlaps, to not affect multiple services or CI's at a time. It is an excellent practice to follow the rule: "One timeframe - one change request."
To schedule a change request, please complete the following steps:
- In the Planned tab, enter a date and time when the request has to be started and finished processing into the appropriate fields (Planned Start Date and Planned End Date).
- After the request was processed, enter the actual date and time into the appropriate fields (Actual Start and Actual End).
To plan a change request, fill in the following fields in the Planning tab:
- Pre-test Plan - describe the process of pre-implementing testing;
- Change Plan - describe the process of the change request implementing;
- Test Plan - describe the process of post-implementing testing;
- Backout Plan - the plan of activities to rollback the system or service or CI condition to its previous state, in case of failed implementation
All these fields are mandatory.
Change Requests Prioritization
The priority of the Change Request can be figured out based on its impact and urgency using a priority matrix.
The impact of a change indicates the potential damage (in case of emergency changes) or effect (in case of standard or normal changes) that will be caused to the business user or service or CI.
In SimpleOne, the impact can be categorized as:
- Low;
- Medium;
- High;
- Very High.
The urgency of a change indicates the measure of time in the following cases:
- Until a change has an impact on the business - in case of emergency changes;
- Until change lack of implementing will impact the business services or CI- in case of standard or normal changes.
In SimpleOne, the urgency can be categorized as:
- Low;
- Medium;
- High;
- Very High.
Based on the priority, changes can be categorized as:
- Low;
- Moderate;
- High;
- Critical.
Excerpt Include Priority Management Priority Management
The risk of the Change Request can be figured out based on the following metrics:
- Impact;
- Probability;
- IT Service Business Criticality.
The IT Service Business Criticality metric specifies how crucial can be disruption of this service for the business. The options are High or Low.
Risk metrics for IT Service Business Criticality = Low
| Probability / Impact | Low | Medium | High | Very High |
|---|---|---|---|---|
| Low | Low | Low | Medium | High |
| High | Medium | Medium | High | High |
Risk metrics for IT Service Business Criticality = High
| Probability / Impact | Low | Medium | High | Very High |
|---|---|---|---|---|
| Low | Low | Medium | High | High |
| High | High | High | High | Very High |
| Table of Contents | ||||
|---|---|---|---|---|
|