Create a widget
A widget includes four components that define its appearance and behavior:
- Template specifies widget views and the way they are displayed with HTML and SimpleTags. It also allows end-users to input and to interact with data.
- Server script runs a JS script on the server-side and processes the data received from the client-side and passes it back.
- Client script runs a JS script on the client-side, so that it receives the data from the server-side, processes the data before rendering, then passes it to the widget template. Also, the client script passes the input data received to the server-side.
- Demo data specifies widget options available for further customization and processing if needed.
Role required: admin.
To create a widget, complete the following steps:
- Navigate to Portal Structure → Widgets.
- Click New and fill in the fields.
- Click Save or Save and exit to apply the changes.
Widget form fields
Field | Mandatory | Description |
|---|---|---|
Name | Y | Specify the name of the widget. |
Description | Y | Add a detailed description of the widget. |
Active | N | Select this checkbox to activate the widget. You cannot add inactive widgets to forms or pages. |
Tables | N | Specify the tables on the forms of which you need to add the widget with the form layout functionality. To make the widget available for adding to any table, select the Global (sys_global) table. |
Inherited | N | Select this checkbox to make the widget available for adding to the form records of the child tables. |
Template | N | Determine the widget display view with the <div> container: <div></div> Use SimpleTags to define the form, fields, and the behavior you need: <div> <textarea></textarea> <button></button> </div> Apply tag attributes to specify and describe the widget element behavior: <div> <textarea label="Name" model="data.name"> </textarea> <button event-click="window.s_widget_custom.submit();"> OK </button> </div> |
CSS | N | Specify the CSS classes to create the structure and style of the widget. |
Server script | N | Specify a script that defines how the widget sends, receives and processes system events on the server-side. The server script uses the input object to access the data received from the client controller and the data object for processing and sending it back in JSON. Use the server-side API to create a server script. |
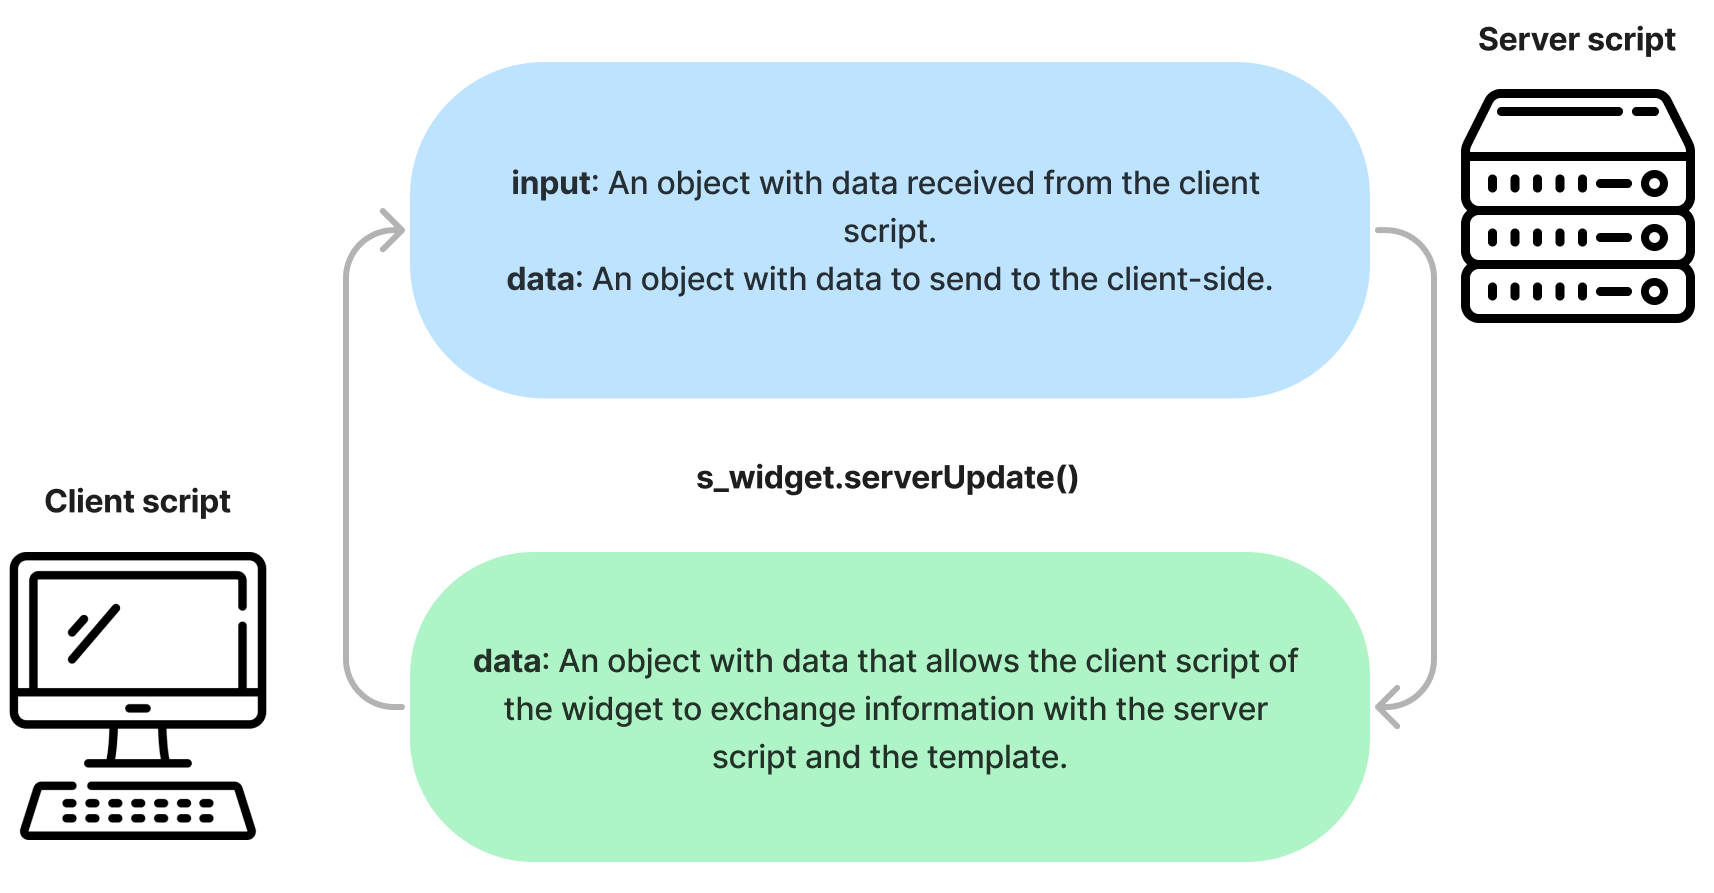
Client script | N | Specify a script that defines how the widget sends, receives and processes system events on the client-side. The client script uses the data object to access the server data. After processing the data by the client script, invoke the s_widget.serverUpdate() method to send the data to the server controller. When this method is called, the server script data object automatically overwrites the client controller data object. Use the client-side API to create a client script. The client controller uses the s_widget object to invoke the SimpleWidget(s) API methods. It is not recommended to use native JS methods and properties manipulating the Document Object Model in widget client scripts. For example, using such properties as Element.innerHTML or Element.outerHTML in the client scripts can cause malfunction. To avoid errors, use the methods provided and supported by the vendor instead. See the example below. Usage example // Not Recommended
document.querySelector(".article-body").innerHTML = s_widget.getFieldValue('body');
// Recommended
s_widget.addTemplate('body', s_widget.getFieldValue('body'));
|
Demo data | N | Specify the widget options used for the preconfigured widget. Use the formatting below to define the options: {"value_1": "1"; "value_2": "abc"}
value_1 and value_2 are options, with the '1' and 'abc' values set by default. These options can be overridden: |
The following scheme illustrates how the data is passed between the server and client scripts using the global objects:
Widget example
The following example illustrates the components of the widget that display the fields:
- Incident – a reference field that allows selecting an item from the Incident (itsm_incident) table.
- Description – a text field with a description of the selected Incident (itsm_incident). The field is empty by default.
- The Get button – fills in the Description field with the description of the related incident.
- The Send button – overwrites the selected incident description in the database with the value specified in the Description field.
- The Go button – opens the selected incident item on the current page.
Server controller
The server controller uses the data.incident variable to access the input.incident variable data received from the client controller. Depending on the input.operation_code variable value received, the server controller runs the query to the database to:
- Get the incident description within the getIncidentDescription(incident_id) function.
- Update it within the sendIncidentDescription(sys_id, description) function.
- Get a redirect URL within the createUrlFromIncidentNumber(sys_id) function.
Client controller
You can set user methods for the widgets with the window.s_widget_custom variable in the client script.
The client script includes three s_widget_custom methods declared:
- window.s_widget_custom.getDescription – to get an incident description from the server controller.
- window.s_widget_custom.sendDescription – to send it back.
- window.s_widget_custom.goToIncident – to open the incident record form.
Each method invokes s_widget.serverUpdate() for sending and receiving data back from the server controller. The data object allows accessing the redirect_url variable received from the server script.
HTML Template
The widget template defines the fields and buttons displayed using HTML and SimpleTags. Clicking the buttons activates the methods declared in the client controller.
Use the CSS field to specify a style of the template components displayed.
Widget interaction
In cases when you need widgets to interact with each other, use s_widgets methods in your client scripts:
Receive and change the widget data with the s_widgets.getFieldValue(widgetID, key) and s_widgets.setFieldValue(widgetID, key, value) methods:
window.s_widgets.getFieldValue('157555401214600424', 'name');
window.s_widgets.getFieldValue('157555401214600424', 'name', 'Alex');
Get all the IDs of the widgets on the current page using the s_widgets.getWidgets() method:
window.s_widgets.getWidgets();
See what elements the widget contains using the s_widget.getElements() method:
window.s_widget.getElements();