You are viewing an old version of this page. View the current version.
Compare with Current View Page History
« Previous Version 3 Next »
A user query is one of the core components used in the communication between the end-user and the service desk department. User queries come to the fore when the end-user is not able to classify the type of their issue, whether it is an incident or a service request.
Create a user query
You can create a user query in two ways:
- via the Self-Service Portal
- via the agent interface
via the Self-Service Portal
To create a user query, complete these steps:
- Navigate to your Self-Service Portal and click Ask a question.

- Fill in the fields.
- Click Save.
User query form fields
| Field | Mandatory | Description |
|---|---|---|
| Number | Y | User query number. This field has the INCXXXXXXX format and is populated automatically. |
| Contact Type | Y | Define the source from which the request is received. Available options:
|
| Caller | Y | Specify the originator of the user query. |
Urgency | Y | Specify the urgency of the issue. Typically, it is evaluated based on the time remaining until the issue impacts the business. Available options:
|
| Subject | Y | Type a brief description of the issue. |
| Description | N | Type a detailed description of the issue. |
After the form is saved, a record is created in the Inquiries (itsm_inquiries) table. At this time, the newly created user query is waiting to be processed by a service desk agent.
via the agent interface
To create a user query, complete these steps:
- Navigate to User Queries → All User Queries.
- Click New to add a record for a new user query and fill in the fields.
- Click Save or Save and Exit.
User query form fields
| Field | Mandatory | Description |
|---|---|---|
| Number | Y | User query number. This field has the INCXXXXXXX format and is populated automatically. |
| Contact Type | Y | Define the source from which the request is received. Available options:
|
| Caller | Y | Specify the originator of the user query. |
| Company | N | Specify the company to which the user query is related. |
| Related Tickets | N | Specify the related configuration items affected by the user query. The user query is automatically connected to a related record and displayed on its form. |
| Subject | Y | Type a brief description of the issue. |
| Description | N | Type a detailed description of the issue. |
| State | N | This field displays the work state. Available states:
|
| Urgency | Y | Specify the urgency of the issue. Typically, it is evaluated based on the time remaining until the issue impacts the business. Available options:
|
Inquiry converting
Inquiries State Model
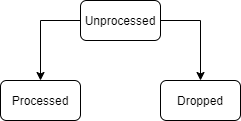
The newly created inquiry is in the Unprocessed state. If it is classified by a service-desk agent, its state changes to Processed. Another possible state is Dropped. Erroneous or spambot inquiries should be dropped.

Once an inquiry is created, it should be processed by ITSM agents. The inquiry process includes its classification as one of the specific issue types.
The following issue types are available:
- Incident
- Problem
- Change Request
- Service Request.
To classify a inquiry, an agent should complete the steps below:
- Navigate to Inquiries → Unprocessed.
- Open the necessary inquiry.
- Click on the UI action named by the needed issue type.

into Incident
Inquiries can be converted to incidents after analysis. For more information about this, please refer to the Inquiry to Incident conversion article.
into Problem
- Navigate to Inquiries → Unprocessed.
- Open the necessary inquiry.
- Click Problem at the top of the form.
- Fill in the mandatory fields in the problem form:
- Service
- Impact
- Assignment group
- Assigned user.
- Click Save or Save and Exit to apply changes.
As a result:
- Original inquiry state is changed to Processed.
- A new Problem record is created in the Registered state.
into Change Request
An inquiry can be converted to a change request after analysis. To do this, an agent should complete the steps below:
- Navigate to Inquiries → Unprocessed.
- Open the necessary inquiry.
- Click Change Request at the top of the form.
- Select a previously created change template from the dictionary. This field is mandatory.
- Click Create to finish the conversion or Skip to cancel.
- Fill in the mandatory fields in the request form:
- Service
- Impact
- Assignment group
- Assigned user.
- Click Save or Save and Exit to apply changes.
As a result:
- Original inquiry state is changed to Processed.
- A new Change Request record is created in the Registered state.
into Service Request
- Navigate to Inquiries → Unprocessed.
- Open the necessary inquiry.
- Click Service Request at the top of the form.
- Select the previously created request model from the dictionary.
- Leave the field empty if this request is classified as non-typical.
- Fill in the mandatory fields in the request form:
- Service
- Impact
- Assignment group
- Click Save or Save and Exit to apply changes
- Click Create to finish the conversion.
As a result:
- Original inquiry state is changed to Processed.
- A new Service Request record is created in the Registered state.
- No labels