The user query is one of the core components used in the communication between the end-user and the service desk department. User queries come to the fore when the end-user is unable to classify the type of their issue, whether it is an incident or a service request.
Create a user query
A user query can be created in three ways:
- via the Self-Service Portal.
- via the agent interface.
- via email – inbound email actions.
Via the Self-Service Portal
This procedure is available for all end-userusers.
To create a user query, complete these steps:
- Navigate to your Self-Service Portal and click Ask a question.
- Fill in the fields.
- Click Save.
User query form fields
The user query number has the INQXXXXXXX format and is populated automatically.
| Field | Mandatory | Description |
|---|---|---|
| Caller | Y | Specifies the originator of the user query. This field is populated automatically and is hidden on the Self-Service Portal form. |
| Contact type | Y | Defines the source from which the request is received. This field is populated automatically according to the origin of the source and is hidden on the Self-Service Portal form. Available options:
|
| Subject | Y | Add a brief description of the issue. |
| Description | N | Add a detailed description of the issue. |
| Urgency | Y | Specify the urgency of the issue. Typically, it is evaluated based on the time remaining until the issue impacts the business. For more information, see Priority Management. |
You can also attach some files by using the attachment window. To add files, drag them to the attachment window, or click Upload from computer and select them on your device.
After the form is saved, a record is created in the User Queries (itsm_inquiries) table. At this time, the newly created user query is waiting to be processed by a service desk agent.
You can track the work process on the My Tickets page. To open the record of the user query, complete the steps below:
- In the header, navigate to Cabinet → My Tickets.
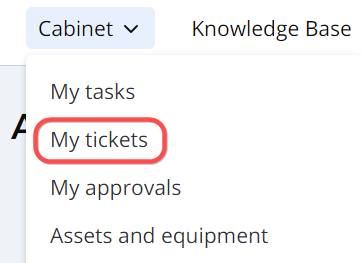
- Click My User Queries on the left.
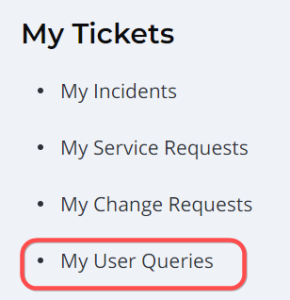
- Check the state of the created user query.
Via the agent interface
Role required: ITSM_agent.
To create a user query, complete these steps:
- Navigate to User Queries → All User Queries.
- Click New to add a record for a new user query and fill in the fields.
- Click Save or Save and exit to apply the changes.
User query form fields
The user query number has the INQXXXXXXX format and is populated automatically.
| Field | Mandatory | Description |
|---|---|---|
| Caller | Y | Specify the originator of the user query. |
| Contact type | Y | Define the source from which the request is received. Available options:
|
| Related ticket | N | Specify the related configuration items affected by the user query. The user query is automatically connected to a related record and displayed on its form. |
| Subject | Y | Add a brief description of the issue. |
| Description | N | Add a detailed description of the issue. |
| State | N | This field displays the work state. Available states:
|
| Urgency | Y | Specify the urgency of the issue. Typically, it is evaluated based on the time remaining until the issue impacts the business. For more information, see Priority Management. |
User query states
A newly created user query is assigned the Unprocessed state. Once it is classified by a service desk agent, the state changes to Processed. Another possible state is Dropped, which is typically assigned to erroneous or spambot user queries.

Once a user query is created, it should be processed by ITSM agents. The processing of a user query involves its classification as one of the specific record types.
The following record types are available:
- Incident
- Problem
- Change Request
- Service Request
To classify a user query, an agent should complete these steps:
- Navigate to User Queries → Unprocessed.
- Open the required user query.
- Select the type by clicking the respective button in the top-right corner of the form.

Create other record types from user queries
In SimpleOne, a record of another type can be created from a user query after it is analyzed:
Create an incident from a user query
After a user query is analyzed, an incident can be created from it. For more information, see the Create Incidents article.
Create a problem from a user query
After a user query is analyzed, a problem can be created from it. To do so, complete the steps below:
- Navigate to User Queries → Unprocessed.
- Open the required user query.
- Click Problem in the top-right corner of the form.
- Fill in the mandatory fields in the problem form.
- Click Save or Save and exit to apply the changes.
As a result:
- The original user query state is changed to Processed.
- A new Problem record is created in the Registered state.
Create a change request from a user query
After a user query is analyzed, a change request can be created from it. To do so, complete the steps below:
- Navigate to User Queries → Unprocessed.
- Open the required user query.
- Click Change Request in the top-right corner of the form.
- Select a previously created change template from the dictionary. This field is mandatory.
- Click Create to confirm the selection, or Skip to cancel. In the second case, you will need to select the Change Type.
- Fill in the mandatory fields in the request form:
- Click Save or Save and exit to apply the changes.
As a result:
- The original user query state is changed to Processed.
- A new Change Request record is created in the Registered state.
Create a service request from a user query
After a user query is analyzed, a service request can be created from it. To do so, complete the steps below:
- Navigate to User Queries → Unprocessed.
- Open the required user query.
- Click Service Request in the top-right corner of the form. The request model selection widget opens.
Specify the required service request model in the corresponding field.
Leave the field empty if this request is classified as non-typical. When you click Continue, you are redirected to the create new request form.
Starting from ITSM Application version 1.7.1, the request models from the REM service catalog are used. However, you can still use request templates as in previous versions. To learn how to do this, see the instruction below.
Click Continue.
A widget appears on the user query form that contains the request model name, REM fields and the Copy caller from the user query checkbox.
The checkbox is selected by default. Clear the checkbox to make the current user who creates the Service Request the Caller.
- Fill in the mandatory fields and click Create. A request record is created, and you are automatically redirected to it.
As a result:
- The original user query state is changed to Processed.
- A new service request record is created in the Registered state.
- The Subject, Description, Urgency, Contact Type, and Followers List fields are automatically populated with the values from the original user query.
- A reference to the original user query is automatically added in the Related User Query field of the Related Records section.
- A reference to the created request is automatically added to the Related Ticket field of the original user query.
- If a REM request model is used:
- The Model Attributes section is added to the request, containing the REM-attributes of the model used.
- The request model is automatically specified in the Related request model field.