Configuring the form layout allows changing the form appearance. You can configure how fields are placed on the form (this is what it is form layout); also, you can configure related lists layout.
These settings allow tweaking the form for the different business tasks, for example, creating separate forms and lists for different processes or user roles.
Form layout allows us to show or hide elements; allows grouping them into sections.
Form layout view
To change a form layout, follow the steps below:
- Open the form you need to reconfigure;
- Enter the hamburger menu on the left side at the bottom of the page;
- Select Configure -> Form Layout;
You will see a form layout view with two slushbuckets.
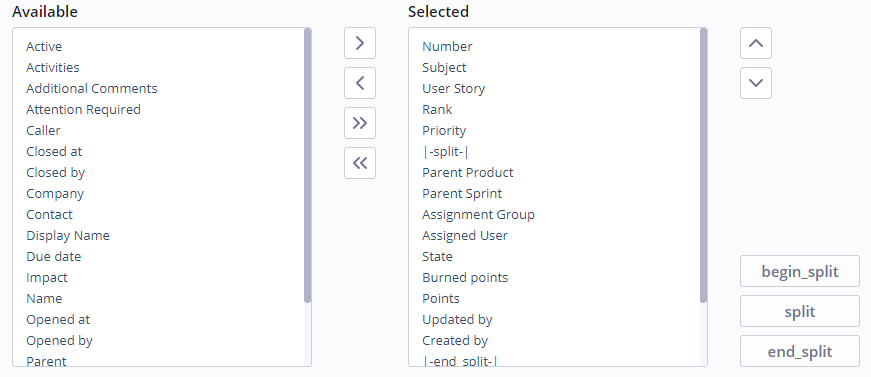
- To add elements into the form, move the desired fields from the left slushbucket to the right one with the ">" button. You can add all the fields by clicking the ">>" button. When you’re done, click Save;
- To remove elements from the form, move the needless fields from the right slushbucket to the left one with the "<" button. You can remove all the fields by clicking the "<<" button. When you’re done, click Save;
- To change fields order on the form, move them up and down with the appropriate button at the left of the form. When you’re done, click Save.
Splitting the form
By default, fields on the form go from top to bottom in one column. If you need to rearrange them, for example, in two or more columns, then you can use splitters for this.
- Decide the first and the last fields of the new column;
- Enter the form layout view;
- Click the Split button. The splitter created will appear at the bottom of the list;
- Using UP and DOWN buttons, move it, so it is over the first field of the column;
- Click the End Split button. The splitter created will appear at the bottom of the list;
- Using UP and DOWN buttons, move it, so it is under the last of the column;
- Click the Save button at the top of the page.
You can make a single field to take up a whole line. For this, you need to put it into a separate block built by the splitters.
The guidelines are similar to the listed above, except for item 3. You need to use the Begin Split button instead of the Split button.
Секции
Каждое поле является элементом формы. Элементы на форме могут быть сгруппированы в секции. Секции служат для смыслового и визуального разделения полей на группы. Для того, чтобы создать секцию и наполнить её полями, сделайте следующее:
- Войдите в настройку формы:
- В Form view and section нажмите add new, дайте ей имя
- Наполните его полями в соответствии с инструкцией выше, нажмите save.
На форме появится новая секция с добавленными вами полями.