Global Search allows searching information with The global search allows users to search for information by words, parts of word words, and even phrases. Using the search functionality provides you a fast reach of the data you need.phrases.
Before sending a query to the database, the search engine gets available Search Groups along with the portal URL if it is specified. Within each group, when the search query is performed through the Search Table included, they are checked against the ACL Rules, and then through the Search Indices. Thus, the query is processed and the results are displayed only for the fields available to a particular user.
| Tipnote |
|---|
Role required: admin. |
Search configuration guide
To configure global search in the agent interface, complete the steps below:
- Create a Search Group.
- Create
- a Search Table.
Configure
To configure global search on the self-service portal, complete the same steps, but select the required portal in the Portal field of the Text search group form.
| Note |
|---|
If there are no active records in the Text Search Group (ts_group) or Text Search Table (ts_table) tables, the search is not performed users with the Search Groups settings. |
Create a
Search Grouptext search group
The search groups are intended to categorize tables in which the search is performed.Search groups specify the categories for outputing search results.
To create a search group, follow complete the steps below:
- Navigate to <your_instance_URL/list/ts_group> System Settings → Text Search Groups.
- Click New .Fill and fill in the formfields.
- Click Save or Save and Exit to apply the changes.
Text search group form fields
| Field | Mandatory | Description |
|---|---|---|
| Name | Y |
| Specify the name of |
| the group displayed in the search results panel. |
| Portal |
| N | Select a portal to make the search group available |
to its users. The search group |
will only be available on the selected Portal. To make the search |
group available in the agent interface, leave this field empty. | ||
| Order | N | Enter |
an integer |
to set the relative position of the group in the search results |
panel. Groups are displayed in |
ascending order. |
| Description |
| N | Add a description of the search group. |
| Active |
| N | Select this checkbox |
| to make the group available and visible |
| to users in the search results panel. |
| Opened by default | N | Select |
this checkbox |
to make the group |
expanded by default in the search results |
Ex., the Task search group below has the inactive Default opened checkbox.

panel. |
Create a text search table
Search tables specify data sources for text search indexing. Within the groups, these tables also collect the search results, determining its their categories.
The system property search_text_service.excluded_tables allows you to specify tables that do not
appearedappear as
options whenoptions when setting up the Search tables.
To To create a search table, follow complete the steps below:
- Navigate to <your_instance_URL/list/ts_tables>System Settings → Text Search Tables.
- Click New .Fill and fill in the formfields.
- Click Save or Save and Exit to apply the changes.
Text
Search Tablesearch table form
| Field | Mandatory | Description |
|---|---|---|
| Name | Y | Enter the name of |
| the table displayed in the search results panel. |
| Table |
| Y | Select the source table |
containing data indexed for search. |
Assign a group to the table for displaying the search results.
Click the magnifier icon ![]() and select a search group.
and select a search group.
Enter the integer number in the field, to define the sequence in which the search results tables displayed.
The tables are displayed in the ascending order.
Set this checkbox active to make the search table available and visible for users.
Configure indexed columns
If
To make a table column indexed, follow the steps below:
| ||||
| Search group | Y | Select a search group in which the table search results will be displayed. | ||
| Displayed fields | N | Select the table fields to display in the search results if the values in those fields match the search query.
| ||
| Subinfo fields | N | Select the table fields that are always displayed in the search results. | ||
| Filter | N | Use the condition builder to filter and sort the search results. | ||
| Order | N | Enter an integer to set the relative position of the table within its search group. The tables are displayed in ascending order. | ||
| Active | N | Select this checkbox to activate the search table and make it visible to the users in the search results. |
Default search groups and tables
The following search groups and tables are configured out-of-the-box:
| Expand | ||
|---|---|---|
| ||
|
| Expand | ||
|---|---|---|
| ||
|
Configure search indices
The Search Indices (sys_search_index) table contains text values of the indexed columns. These values are used for the global search. The records in this table are automatically created when a new record is created in a table containing an indexed column. Empty fields are ignored.
| Note |
|---|
You cannot create, edit, or delete records in the Search Indices (sys_search_index) table. Only users with the admin role can read them. |
Search Index form fields
| Field | Description |
|---|---|
| Record | The ID of the record that contains the indexed field. |
| Table | Reference to the table that contains the indexed column. |
| Column | Reference to the indexed column of the Table. |
| Text | The text value of the indexed field. It is automatically updated if the value of the indexed field changes. |
To index a column, complete the steps below:
- Navigate to System Settings → All Columns.
- Find the required column in the list and open it.
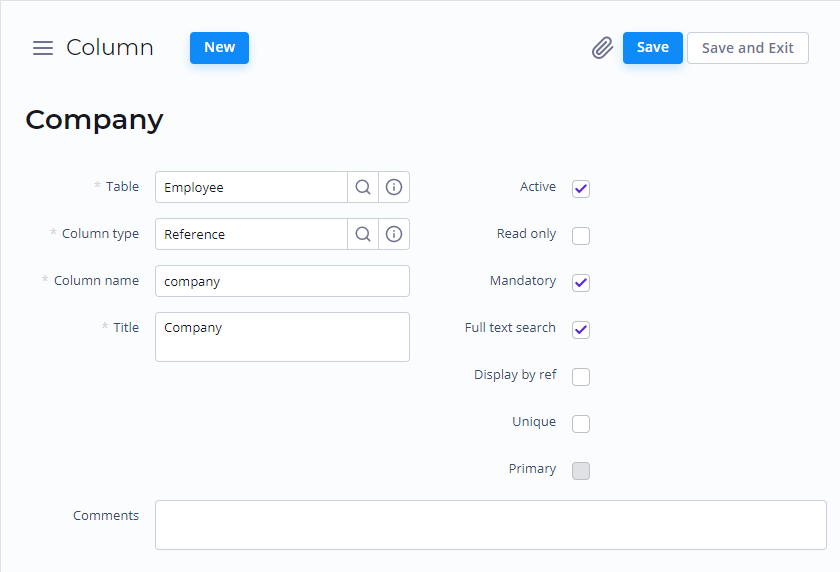
On the record form, select the Full Text Search checkbox.
Note If the column is of the Reference type, ensure that the Display by Ref checkbox is selected. If not, select it. Otherwise the column values will not be indexed.
- Navigate to <your_instance_URL>/list/ts_table.
- Click the information icon
 on a desired table record, then click Open Record on its preview form.
- On your Text search table form, click the information icon within the Table field, then click Open Record on the preview form.

- On the Table form, scroll down to the Related List, and, on the Column tab select the column you want to index:
- Click the information iconon the column record.
- Click Open Record on the preview form to enter the column form.

- Click the information icon
- On the Column form, set the Full text search checkbox to active state.
- Click Save or Save and Exit to apply the changes.
As a result:
- All existing records are indexed.
- All new records will be indexed when they are created.
| Table of Contents | ||||||
|---|---|---|---|---|---|---|
|