A Timepoint Indicator An indicator is a rule of a time counter activation that is specified by proper conditions for starting, pausing, and resetting, and stopping this counter. It also determines a the time limit for declaring SLA as breached and contains and contains time conditions of a Commitment commitment type implementation.
For example, based on your SLA agreement,you can create separate SLA separate SLA indicators for incidents that are having an impact from "Low" to " to Very High" and set a separate "separate Breach Time" value for them, based on your SLA agreement.
When aan Timepoint indicator starts, the system automatically generates aan Timepoint Indication, which is a time indication, a time counter that tracks current timings and time points of the target service level commitment.
Depending on your business needs, you may need different types of indicators:
- standard – indicator creates indications that start or complete when specified conditions are met, or the duration ends.
For example, the start time is when the task state changes to Assigned. - retrospective – indicator creates indications that count time based on the Date/Time column defined manually. Indications are created for records meeting specified conditions. To use this type of indicator, select the Defined by field option in the Indication start time and specify the field you need.
For example, the start time is the value of the Opened at field, and the indication is created when the task state changes to Assigned.
| Tip |
|---|
Role required: service_level_manager. |
Timepoint Creating Indicator
To add a new Timepoint Indicatorindicator, follow please complete the following steps below:
- Navigate to the to Service Level Management → Timepoint Indicator menu.
- Click New Click New and fill in the form.
- Click Save or Click Save or Save and Exit to to apply changes.
The Timepoint Indicator form fields
Field | Required | Description |
|---|
| Name | Y |
A timepoint indicator nameSpecify the indicator name. | Note |
|---|
Do not give the same name to indicators when creating them for the same table; otherwise, they will not work correctly if edited or deleted later. |
|
| Agreement | N | Specify |
an related | related to this indicator containing tracking metrics. |
| Commitment type | N | Specify |
a the commitment type for this indicator. Available options: |
time - - Time – the time it takes to resolve the issue (generally,
|
a - the time from issue creation
|
until the "Completed" status update- to its state changed to Completed).
- Response
|
time - the - Time – the time it takes to process the issue in a non-automated
|
- a time - the from the issue creation
|
until the "- to its state changed to In Progress
|
" status update task-based entity (Incidents, Problems, Requests) that applied to define conditions of the Indicator attachment.table to apply the Indicator conditions. | Note |
|---|
After saving the form, the Table field becomes read-only. This is done: - to ensure the performance of indications for which start or breach time is specified by the appropriate field.
- to keep the logical consistency and the correct indicator's work.
|
|
| Inheritance | N | Select this checkbox if you are creating an indicator |
on for a parent table, and it is necessary to use it |
against of the The table considered thought of as a parent table, and |
|
every extending it is a single service request. |
|
Turning By enabling this attribute |
|
on a single on for a parent table which will affect every child table created. |
|
Parent dependency columnIn this field, you can specify a column in case if you need to build "parent-child" dependencies between indicators. | | Select this checkbox to make the indicator active or inactive. |
Indication start time | Anchor |
|---|
| indication start time |
|---|
| indication start time |
|---|
|
| N | Select one of two options: - Defined by condition – for standard indications. The standard indication start time is when a record meets the conditions defined in the Start Conditions tab.
- Defined by field – for retrospective indications. Retrospective indication start time is based on the value retrieved from the Date/Time column specified in the Start time field. The record must also meet the conditions defined in the Start Conditions tab. Unlike the standard indication, the time when the conditions were met is ignored.
|
| Start time field | Y | Define the column of the Date/Time type from which indications will be calculated, i.e., an indication retrieves the value for the start time from this column. | Info |
|---|
The field appears if the Defined by field option is selected in the Indication start time field. |
| Note |
|---|
| Note that a retrospective indication counts the value relevant at the time of indicator creation. If the value changes, indications will not be recalculated. |
|
| Indication breach time | N | Select one of two options: - Defined by duration – the indication breach time is based on the Duration value. The timing of the SLA breach also takes into account pause durations.
- Defined by field – the breach time indication is based on the value retrieved from the Date/Time column specified in the Breach time field.
| Note |
|---|
After saving the form, the Indication breach time field becomes read-only. |
|
| Breach time field | Y | Define the column of the Date/Time type from which indications will be calculated, i.e., an indication that retrieves the value for the breach time from this column. After saving the form, the Breach time field field becomes read-only. | Info |
|---|
The field appears if the Defined by field option is selected in the Indication breach time field. |
| Note |
|---|
- If the value of the referenced field is less than Start Time or Minimum duration, no indication will be created.
- If the value of the referenced field changes, the value in the related Indication record will be changed, and related fields will be recalculated.
- If the value of the referenced field changes, and it is less than Start Time or less than Minimum duration, the indication will be canceled.
|
|
| Business duration | Y | Set up a business time measure for the SLA to run before it is marked as Breached. | Info |
|---|
The field changes to Minimum duration if the Defined by field option is selected in the Indication breach time field. |
| Note |
|---|
Note that all day duration (not just business hours) according to the chosen schedule is taken into account. See the calculation samples below this table. |
|
| Minimum duration | Y | Set a minimum duration that restricts the creation of an indication and its existence. After saving the form, the Minimum duration field becomes read-only. | Info |
|---|
The Minimum duration field appears if the Defined by field option is selected in the Indication breach time field. |
|
| Active | N | Select this checkbox on to make the Timepoint indicator active or inactive. |
Duration | Y | The length of time the SLA runs before it is marked Breached. |
|---|
Please note that all day duration (not |
|
only according according to the chosen schedule is taken into account. See the calculation samples below this table. |
|
| Schedule | Y |
A Select a working schedule |
selected from the list. It determines the working hours that the system uses when calculating |
an the implementation implementation under certain conditions. To configure this timeline, use |
the featuresDetermines a Timepoint indicator TimezoneDetermine an indicator Timezone. | Note |
|---|
Only active timezones are available to choose from. |
|
| Timezone source | Y | Select one of the available records from the drop-down list if you need to specify a special timezone bond. The default value is |
Timepoint 's timezone. Available options: |
Caller's CI 's locationTask location's Timepoint Indicator's timezone
| Note |
|---|
| title | Indicator inheritance |
|---|
|
Please keep in mind that if you create an inherited indicator on for a parent table, and after that a separate usual indicator on for a child table, the indications are to will be created only for a child table. |
Also, when creating an inherited indicator for a parent table, please remember that the extended attributes from child tables will not be available there. See the brief illustration below:
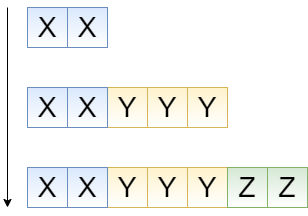 Image Added
On this picture, the table set is displayed:
- The parent table, attribute set is XX
- The child table 1, attribute set is XXYYY
- The child table 2, attribute set is XXYYYZZ
Because attribute inheritance is going top-down, table attributes (such as fields) that extend parent tables will be inaccessible on the lower level. Please note that when configuring conditions of your indicator, make all critical attributes accessible on the top level.
Duration calculations
Example 1.
Company A uses schedule "24x7", which means 24 working hours, 7 days a week, and around-the-clock shift-working, as an example. In this case, if work. If you enter "2" into the days field, this value is converted to 48 working hours or 2 working days. Nothing extraordinary.
Example 2.
Company B uses schedule "8x5" schedule , which means 8 working hours, 5 days a week, one of the most common working schedules. In this case, if If you enter "2" into the days field, this value is converted to 48 hours (because there are 24 hours in a day), which gives 6 working days.
Specifying indicator conditions
To specify the conditions you need to fill in the following tabs:
Field | Required | Description |
|---|
| Start |
Condition make Timepoint startstarted. The system uses the Table fields as transactional data to verify the conditions. When the transactional data changes, the system checks these conditions. E.g. |
, "" as a condition field with one of the possible values |
- "" "" "" "" setting setting allows to establish a condition |
for to start cancellation by one of the options below: - Start conditions are not met
|
: the - – the system ignores the start conditions if it
|
doesn't ;: setting The Condition Builder for cancel conditions appears only after selecting the In other words, if the system meets these cancel conditions, it ignores the start conditions.To set cancel conditions, use Condition Builder below the When to cancel menu. - Do not cancel– start conditions are always verified.
|
| Cancel Conditions | Y | This option appears when the |
Cancel conditions are met |
option.Never - start conditions are always verified.option is selected in the When to cancel field. Define additional conditions to meet before the indicator cancels. If the system meets these cancel conditions, it ignores the start conditions. |
| Pause Conditions |
Pause Condition Timepoint Indicator indicator pause. The system uses the Table fields as transactional data to verify the conditions. When the transactional data changes, the system checks these conditions. E.g., for incidents, it is appropriate to use |
"" as a condition field with one of the possible values |
- "" "" "" "" setting setting allows to set a condition for pause resumption |
by using one of the options below: - Pause conditions are not met
|
: - – the system ignores the pause conditions if it
|
doesn't ;: pause The Condition Builder for resume conditions appears only after selecting the |
| Resume Conditions | Y | The field allows defining additional conditions to be met before the indicator has previously paused resumes. In other words, if the system meets these resume conditions, it ignores the pause conditions. |
Resume conditions can be set with the Condition Builder below the When to resume menu.| Info |
|---|
This option appears when the |
|
Resume conditions are met |
|
optionoption is selected in the When to resume field. |
|
Stop ConditionN Timepoint Indicator stop. The system uses the Table fields as transactional data to verify the conditions. When the transactional data changes, the system checks these conditions. |
| Reset |
condition Timepoint Indicator reset. The system uses the Table fields as transactional data to verify the conditions. When the transactional data changes, the system checks these conditions. |
Timepoint indication
A Timepoint Indication is a time counter automatically generated when the Indicator start condition met. It shows all primary timings, time points, and current state of the SLA for a particular task (an incident, a request, etc.), which allows tracking the level of the service quality target indicators.
To monitor the active service level indicators, navigate to Service Level Management → Timepoint Indication.
When creating an Indication record, the system also fills in the fields of this record. Time points and timings are also automatically recalculated when the indicator counting pauses, cancels, or stops.
The Timepoint Indication form
| Field | Description |
|---|
| Indicator | An indicator that triggered the indication creation and started the counter. |
| Record | An original task that induces the SLA counting. |
| Breached | A marker that shows whether SLA has been breached or not. |
| Actual Elapsed Time | An actual time that has elapsed since the moment of an indication creation. It only counts an actual calendar time 24/7. |
| Actual Elapsed Percentage | A percentage of the Actual Time Elapsed to the duration specified in an Indicator according to the SLA. |
| Actual Time Left | An actual time left until the SLA breaches. |
| Stage | The current state of an indication specified with one of the values below: - In progress - an indication is active and the counter is on;
- Paused - an indication counter pauses when the system meets an Indicator pause condition;
- Canceled - an indication cancels counting when the system meets an Indicator cancel condition;
- Completed - an indication counter stops when the system meets stop condition, the SLA is not breached.
|
| Pause on | The last date and time of the Indicator paused. |
| Pause Time | The duration of the Indicator paused. |
| Business Elapsed Time | A business time that has elapsed since the moment of an indication creation. It counts the working calendar specified in the Schedule field of the original Indicator. This field displays how much business time has passed since the task creation. |
| Business Elapsed Percentage | A percentage of the Business Time Elapsed to the duration specified in an Indicator according to the SLA. |
| Business Time Left | A business time left until the SLA breaches. |
| Timings |
|---|
| Start Time | A date and time when the system has created an indication. |
| Complete Time | A date and time when a time counter (an indication) stopped. |
| Breach Time | A date and time of the SLA breach, which the system calculates, taking into the pause duration. |
| Original Breach Time | Original date and time of the SLA breach, calculated at the moment when the system creates an indication. |
Retrospective indications
Sometimes indicators may no longer be valid (for example, after the cancel conditions were met). This happens because the indicator (and the indication as well) originally started with other conditions, and after that, a new indication is to be started.
To simplify this process, retrospective indications delivering percentage recalculation were implemented.
How it works
An indication started with the standard equal to four hours according to relevant agreement.Three hours later, due to meeting the cancel conditions, indication has been canceled.New indication is started in the past retrospectively. The business_elapsed_percentage parameter from the canceled indication is used to make an equation like 0%<business_elapsed_percentage <100%.If the value of this parameter meets the condition, then new indicator duration equates to| Code Block |
|---|
indicator.duration*(business_elapsed_percentage/100) |
.
New indication start time equates to previous indication start time (the started_at field values are the same).| Info |
|---|
This field is unavailable for retrospective indications (the Defined by field option selected in the Indication start time field). |
|
| Note |
|---|
If an indication is not on pause when the reset conditions have been met: - Pause time and its duration are reset.
- Start time is set to the time reset conditions are triggered.
- The breach time and original breach time are recalculated.
- All specifications are recalculated according to the values defined.
If an indication is on pause when the reset conditions have been met: - Pause time are reset.
- Start time and pause time are set to the time the reset conditions are triggered.
- The breach time and original breach time are recalculated.
- All specifications are recalculated according to the values defined
|
| Tip |
|---|
| All this retrospective activities are logged in the History (sys_history) table. To acquaint with them, please navigate to System Logs → History and open the record that is the entry of interest |