Versions Compared

Key

  • This line was added.
  • This line was removed.
  • Formatting was changed.

This widget is to visualize the comments added against the record and visualize the changes in the values of the fields specified.

The comments widget consists of the following parts: 

  1. Input fields (Additional Comments and Work Notes). These fields are of the journal_input type described in Field Types. The difference between them is:
    1. The Additional Comments field is for communication with the requester. It may be, for example, progress updates or clarifying questions. These comments are visible for the requestor in his profile on the Self-Service Portal;
    2. The Work Notes field is for internal communications of the task fulfillers. These comments may be technical and can contain information that should not be shared with the requester.
  2. Activity stream whose essence is to ticket activities logging. It contains the following information:
    1. Which field was changed;
    2. The user who did the change;
    3. Old field value;
    4. New field value. 
Tip
  1. The activity stream may not appear by default on the form. In this case, add the Activities (filtered) field in the form using the Form Layout functionality.
  2. Для того, чтобы изменения записи выводились в стрим, атрибут is_audit на соответствующей таблице должен быть установлен в true
  3. Нужно настроить форматтеры

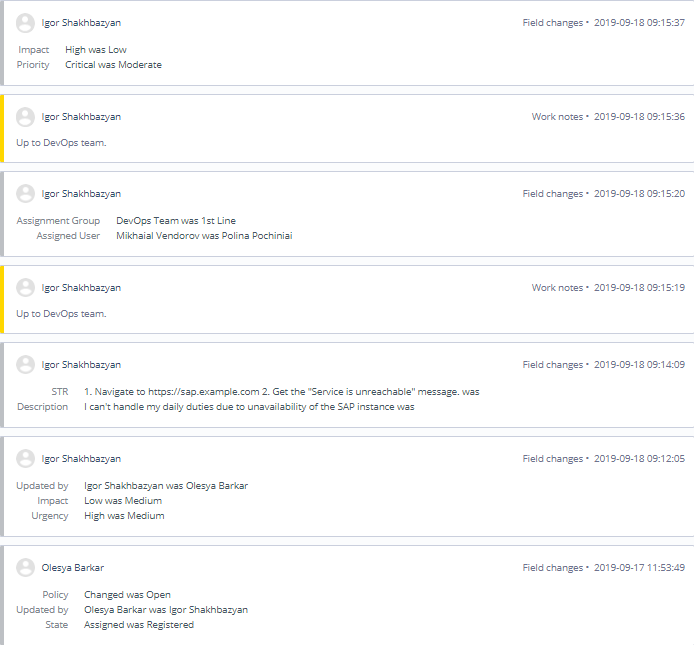
The example of the activity stream is on the screenshot below.

Image Modified

Setting up an activity widget


Tip

Role required: admin.

To configure an activity widget on a form, please complete the steps below:

  1. Add the Activities (filtered) field to the form using the Form Layout functionality.
  2. Turn on the is_audit attribute on a table for which you need to use the Activity Stream widget. To perform this, perform the following steps:
    1. Navigate to System Definition → All Tables
    2. Find the table you are working on (for example, Incident) and click on it
    3. Scroll down to the Controls tab and select the is_audit checkbox
    4. Click Save or Save and Exit to apply changes.
  3. Add a formatter configuring the widget view on a form. To create a new formatter, perform the following steps:
    1. Navigate to System Definition → UI Formatters
    2. Click New and fill in the form.
      1. Name - formatter name
      2. Table - choose the table you are working on (for example, Incident)
      3. Type - leave the type as Formatter if you are creating an activity formatter.
      4. Formatter - select one of the predefined configurations.

Table of Contents
absoluteUrltrue
classfixedPosition